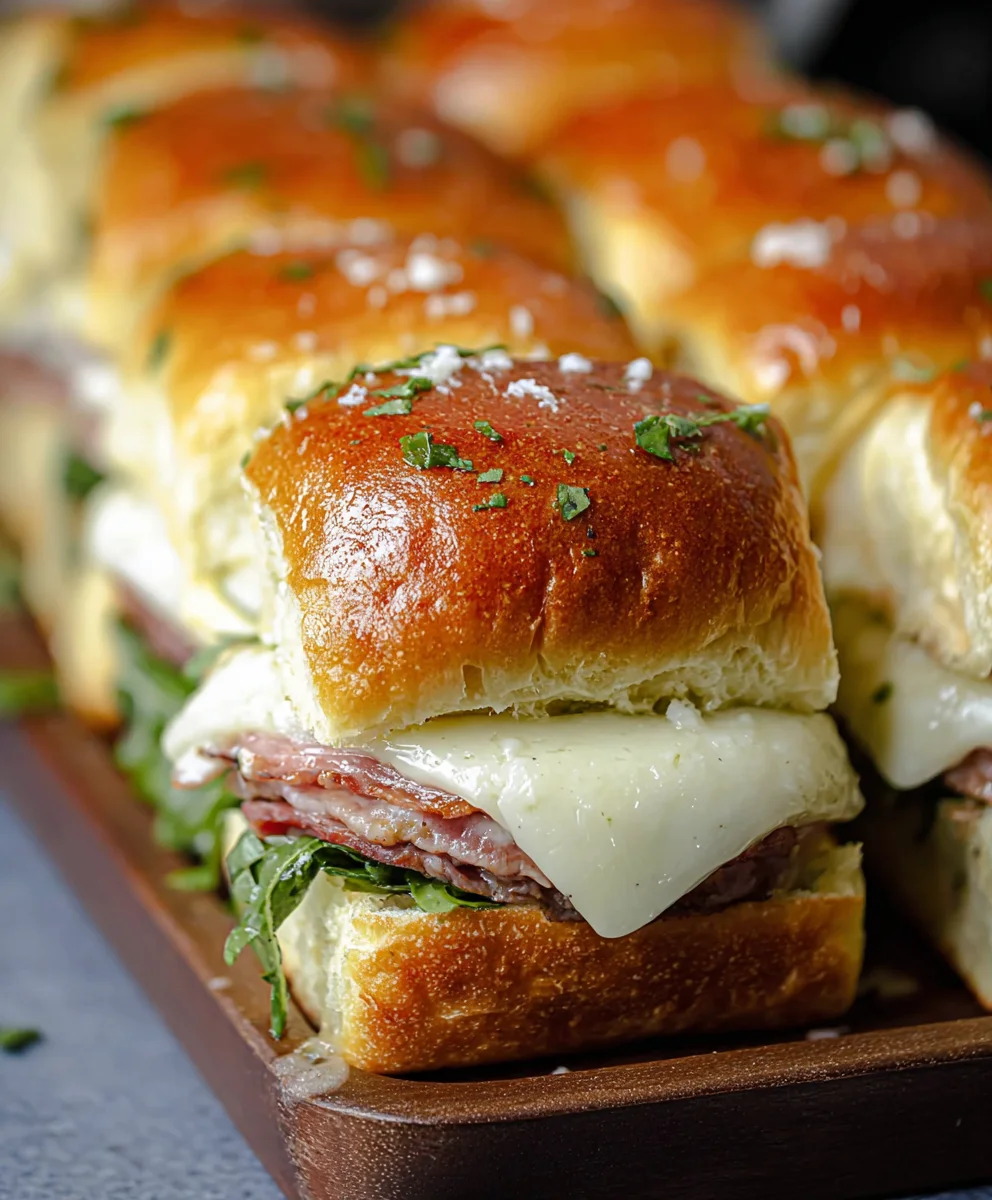
Easy Beef Italian Sliders – Quick & Delicious Appetizers
Italian Sliders are more than just a bite-sized appetizer; they’re a miniature explosion of flavor that transports you straight to the heart of Italy with every delicious mouthful. Who doesn’t love the idea of perfectly proportioned, deeply satisfying little sandwiches packed with classic Italian-American goodness? I certainly do! What truly sets these Italian Sliders apart is their incredible versatility and the way they manage to capture all the comforting, savory notes of a full-sized Italian sandwich in a fun, easy-to-share format. Whether you’re hosting a game day gathering, a casual get-together, or simply craving a taste of home, these sliders promise to be a crowd-pleaser. They’re wonderfully easy to assemble, yet the depth of flavor is something truly special, featuring savory meats, melted cheese, and a tangy sauce all nestled within soft, pillowy buns. Get ready to elevate your appetizer game with these unforgettable Italian Sliders.

Ingredients:
- 12 Hawaiian rolls, (cut in half horizontally)
- ⅓ cup mayonnaise
- 12 slices provolone cheese
- ½ pound hard beef beef salami, (coarsely chopped)
- ½ pound beef beef pepperoni, (coarsely chopped)
- ½ pound beef beef ham, (coarsely chopped)
- ¼ cup butter, (melted)
- ½ teaspoon garlic powder
- ½ teaspoon oregano
- ½ teaspoon basil
- 8 ounce bag shredded lettuce
- ½ cup red onion, (diced)
- ½ cup chopped banana peppers
- ¼ cup mayonnaise
- ¼ cup dill relish
Preparing the Italian Slider Base
Step 1: Assembling the Meats and Cheeses
Begin extract by preparing your delectable meat mixture. In a medium bowl, combine the coarsely chopped hard beef salamialami, beef pepperonieroni, and beef hamf ham. This trio provides a robust and savory foundation for your Italian sliders. Next, spread the ⅓ cup of mayonnaise evenly over the cut side of the bottom halves of the Hawaiian rolls. This acts as a binder and adds a subtle creamy richness that complements the meats. Arrange 6 slices of provolone cheese on top of the mayonnaise-coated bottom halves of the rolls. Don’t worry if they overlap slightly; this ensures maximum cheesy goodness in every bite. Now, evenly distribute the mixed chopped meats over the provolone cheese. Ensure a generous but not overwhelming amount of meat on each slider base to maintain balance. The goal is to have a delightful mix of salty and spicy flavors in every slider.
Step 2: Crafting the Flavorful Topping
Now, let’s create the vibrant and tangy topping that will elevate these Italian sliders. In a separate small bowl, combine the remaining ¼ cup mayonnaise with the ¼ cup dill relish. The dill relish brings a wonderful briny and slightly sweet counterpoint to the richness of the meats and cheese. Stir these two ingredients together until well incorporated. This quick and easy mixture adds a refreshing zest that cuts through the savory elements, making each bite incredibly satisfying. Set this mixture aside for now; it will be added just before serving.
Building and Baking the Italian Sliders
Step 3: Buttering and Seasoning the Top Buns
This is where we infuse our Italian sliders with an irresistible aroma and flavor. Take the top halves of the Hawaiian rolls and arrange them on a baking sheet, cut-side up. In a small microwave-safe bowl, melt the ¼ cup of butter. Once melted, stir in the ½ teaspoon of garlic powder, ½ teaspoon of oregano, and ½ teaspoon of basil. This aromatic butter mixture is key to achieving that classic Italian herb flavor. Using a pastry brush or a spoon, evenly drizzle or brush this seasoned butter over the cut surfaces of the top buns. Make sure every nook and cranny is coated for maximum flavor distribution. This butter basting will create a golden-brown and delightfully crisp topping once baked.
Step 4: Baking the Sliders to Golden Perfection
Preheat your oven to 350 degrees Fahrenheit (175 degrees Celsius). Place the baking sheet with the seasoned top buns into the preheated oven. Bake for approximately 5-7 minutes, or until the tops are lightly golden brown and fragrant. Keep a close eye on them, as Hawaiian rolls can brown quickly. While the tops are baking, gently place the bottom halves of the rolls, now loaded with meat and cheese, onto another baking sheet. Once the top buns are done, remove them from the oven. Immediately after removing the top buns, carefully place the remaining 6 slices of provolone cheese onto the meat mixture on the bottom halves of the rolls. This will allow the cheese to start melting slightly from the residual heat, creating a gooey layer.
Step 5: Finishing Touches and Serving
Carefully remove the baking sheet with the bottom halves of the sliders from the oven. The provolone cheese should be nicely melted and gooey. Now it’s time for the final assembly and the fresh elements. In a bowl, combine the 8 ounces of shredded lettuce, the ½ cup of diced red onion, and the ½ cup of chopped banana peppers. You can optionally toss these ingredients with a tiny splash of olive oil and a pinch of salt and pepper, but it’s not strictly necessary as the other flavors are so robust. Distribute this fresh vegetable mixture evenly over the melted cheese on the bottom slider halves. Finally, generously dollop spoonfuls of the prepared mayonnaise and dill relish mixture over the fresh vegetables. Carefully place the golden-brown, seasoned top buns over the prepared fillings. Press down gently to meld all the delicious layers together. For the best experience, serve these Italian sliders immediately while the buns are still warm and slightly crisp, and the cheese is perfectly melty. These are fantastic for parties, game days, or any casual gathering where delicious, crowd-pleasing sliders are a must!
Conclusion:
We hope you’ve enjoyed exploring this delightful recipe for Italian Sliders! These flavorful mini sandwiches are perfect for a variety of occasions, from casual weeknight dinners to lively game days and impressive appetizer spreads. The combination of savory Italian meats, melted cheese, and toasted buns creates a truly irresistible bite that’s sure to be a crowd-pleaser. Don’t be afraid to get creative and make them your own!
For serving suggestions, these Italian Sliders are fantastic alongside a crisp green salad or a bowl of tomato soup. You can also pair them with your favorite potato chips or a side of pasta salad for a more substantial meal. When it comes to variations, feel free to experiment with different types of Italian-inspired cheeses like provolone or pepper jack. Adding a layer of sautéed onions and peppers or a sprinkle of fresh basil can also elevate the flavor profile. We encourage you to have fun in the kitchen and savor every delicious moment of creating and enjoying these amazing Italian Sliders.
Frequently Asked Questions about Italian Sliders:
Can I make the Italian Sliders ahead of time?
Yes, you can assemble the Italian Sliders ahead of time. Prepare them up to the point of baking, cover them tightly, and refrigerate. When you’re ready to serve, simply bake them according to the recipe instructions, adding a few extra minutes to ensure they are heated through.
What kind of bread is best for Italian Sliders?
While slider buns are ideal for their size, you can also use small dinner rolls or even cut a larger baguette into individual portions. The key is to have a sturdy bun that can hold up to the fillings and toasting process without falling apart.
Easy Beef Italian Sliders – Quick & Delicious Appetizers
These easy beef Italian sliders are a quick and delicious appetizer perfect for parties, game days, or any casual gathering. Featuring a savory mix of beef salami, pepperoni, and ham with melted provolone cheese, fresh lettuce, onion, banana peppers, and a tangy dill relish spread on soft Hawaiian rolls.
Ingredients
-
12 Hawaiian rolls, cut in half horizontally
-
⅓ cup mayonnaise
-
12 slices provolone cheese
-
½ pound hard beef salami, coarsely chopped
-
½ pound beef pepperoni, coarsely chopped
-
½ pound beef ham, coarsely chopped
-
¼ cup butter, melted
-
½ teaspoon garlic powder
-
½ teaspoon oregano
-
½ teaspoon basil
-
8 ounce bag shredded lettuce
-
½ cup red onion, diced
-
½ cup chopped banana peppers
-
¼ cup mayonnaise
-
¼ cup dill relish
Instructions
-
Step 1
In a medium bowl, combine the coarsely chopped hard beef salami, beef pepperoni, and beef ham. Spread ⅓ cup of mayonnaise evenly over the cut side of the bottom halves of the Hawaiian rolls. Arrange 6 slices of provolone cheese on top of the mayonnaise-coated bottom halves of the rolls. Evenly distribute the mixed chopped meats over the provolone cheese. -
Step 2
In a separate small bowl, combine the remaining ¼ cup mayonnaise with the ¼ cup dill relish. Stir until well incorporated. Set this mixture aside. -
Step 3
Take the top halves of the Hawaiian rolls and arrange them on a baking sheet, cut-side up. In a small microwave-safe bowl, melt the ¼ cup of butter. Stir in the ½ teaspoon of garlic powder, ½ teaspoon of oregano, and ½ teaspoon of basil. Drizzle or brush this seasoned butter over the cut surfaces of the top buns. -
Step 4
Preheat your oven to 350 degrees Fahrenheit (175 degrees Celsius). Place the baking sheet with the seasoned top buns into the preheated oven. Bake for 5-7 minutes, or until lightly golden brown and fragrant. While the tops are baking, place the bottom halves of the rolls with meat and cheese onto another baking sheet. Once the top buns are done, remove them from the oven. Carefully place the remaining 6 slices of provolone cheese onto the meat mixture on the bottom halves of the rolls. -
Step 5
Carefully remove the baking sheet with the bottom halves of the sliders from the oven. In a bowl, combine the 8 ounces of shredded lettuce, the ½ cup of diced red onion, and the ½ cup of chopped banana peppers. Distribute this vegetable mixture evenly over the melted cheese on the bottom slider halves. Generously dollop spoonfuls of the prepared mayonnaise and dill relish mixture over the fresh vegetables. Carefully place the top buns over the fillings. Press down gently to meld all the layers together. Serve immediately.
Important Information
Nutrition Facts (Per Serving)
It is important to consider this information as approximate and not to use it as definitive health advice.
Allergy Information
Please check ingredients for potential allergens and consult a health professional if in doubt.