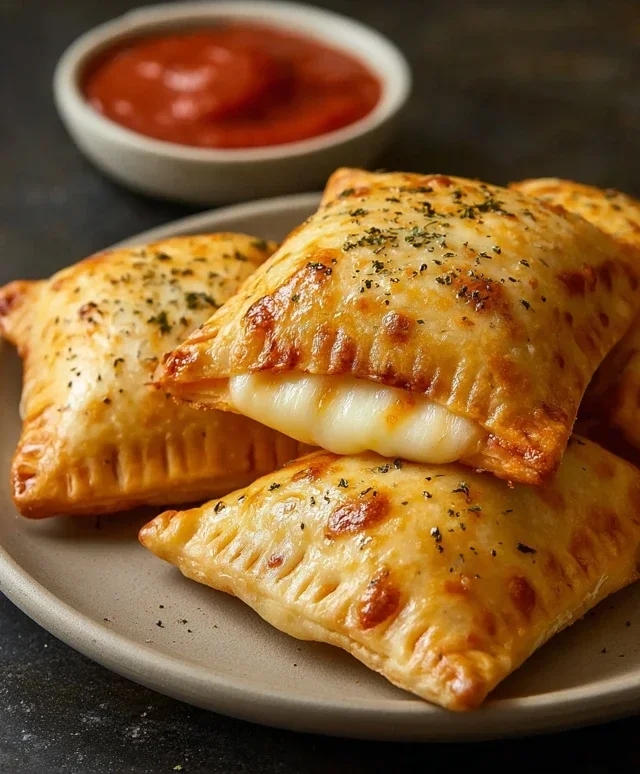
Cheesy Pizza Pockets Recipe- Easy & Delicious Bites
Cheesy Pizza Pockets are the ultimate comfort food, and I’m so excited to share my go-to recipe with you today! There’s something undeniably magical about these warm, doughy parcels bursting with gooey cheese and your favorite pizza toppings. Whether you’re packing a lunchbox, looking for a quick weeknight dinner, or just craving a delightful snack, these cheesy pizza pockets hit the spot every single time. Forget the frozen aisle; making these from scratch is surprisingly simple and incredibly rewarding. The aroma alone will have everyone gathering in the kitchen, eager to get their hands on one. What truly makes these cheesy pizza pockets special is the perfect balance of a slightly crispy exterior giving way to a molten, cheesy interior, all customizable to your wildest pizza dreams. Get ready for a flavor explosion!
Cheesy Pizza Pockets
Who doesn’t love pizza? The melty cheese, the savory sauce, the perfectly crisp crust – it’s a universal comfort food. But sometimes, a full pizza is a bit much for a quick snack, a lunchbox treat, or even a fun appetizer. That’s where these Cheesy Pizza Pockets come in! They’re essentially all your favorite pizza flavors bundled up into a portable, perfectly portioned package. They’re incredibly easy to make, making them a fantastic recipe for bakers of all skill levels, especially if you’re looking for something fun to do with kids. You get that satisfying pizza experience without the fuss of slicing and serving a whole pie. Plus, they are endlessly customizable, so you can tailor them to your exact pizza preferences. Let’s get baking!
Ingredients:
Preparing Your Pizza Pocket Fillings
Before we even think about touching the dough, it’s a good idea to get your fillings prepped and ready to go. This ensures a smooth assembly process and prevents any last-minute scrambling. If you’re using any fresh toppings like mushrooms or diced peppers, it’s best to give them a quick sauté until they’re tender and any excess moisture has evaporated. This step is crucial because you don’t want your pizza pockets becoming soggy from watery vegetables. For beef pepperoni, you can use it as is, or if you prefer a crispier texture, you can lightly fry it for a minute or two on each side. The key is to have everything ready to be spooned into the dough.
Now, let’s talk about that beautiful marinara sauce. You can use your favorite store-bought sauce, or if you’re feeling ambitious, a homemade marinara is always a treat. The important thing is that it’s not too watery. If your sauce seems a bit thin, you can simmer it for a few minutes to thicken it up. This will help prevent any leaks during baking.
In a small bowl, combine your marinara sauce, shredded mozzarella cheese, Italian herbs, and powdered garlic. Give it a good stir to ensure the herbs and garlic are evenly distributed throughout the sauce and cheese mixture. This is where all those classic pizza flavors really start to come together. If you’re adding other cooked toppings like crum extractbled sausage or finely diced beef ham, you can gently fold them into this mixture now.
Assembling Your Pizza Pockets
This is where the magic happens! We’ll take our refrigerated pizza dough and transform it into delightful pockets. If you’re using a can of pizza dough, carefully unroll it onto a lightly floured surface. If you’re using crescent rolls, you’ll want to pinch the seams together to form a solid sheet. The goal is to create individual pockets that can hold our delicious filling.
For standard pizza dough, I like to divide it into roughly equal portions. You can aim for about 6-8 portions, depending on how large you want your pockets. For each portion, gently flatten it into a rough circle or rectangle. The size should be manageable for filling and sealing. If you’re using crescent rolls, simply separate them along their perforated lines.
Now, take about 2-3 tablespoons of your prepared marinara and cheese mixture and place it onto one half of each dough portion, leaving a small border around the edges. This border is essential for sealing. Be careful not to overfill, as this can make sealing difficult and increase the chances of your pockets bursting open during baking. If you’re adding extra toppings like beef pepperoni slices, arrange them on top of the sauce and cheese mixture.
Sealing and Baking Your Pizza Pockets
Once your pockets are filled, it’s time to seal them up tight. Take the other half of the dough and carefully fold it over the filling. Press down firmly along the edges to seal. You can use the tines of a fork to crimp the edges, which not only creates a decorative pattern but also ensures a really secure seal. This is a really important step to prevent any of that gooey cheese and delicious sauce from escaping during baking. If you see any tiny gaps, just press them together again.
Now, it’s time to get these ready for the oven. Preheat your oven to the temperature recommended on your pizza dough or crescent roll packagin extractg, usually around 375°F (190°C). Line a baking sheet with parchment paper for easy cleanup. Carefully place your senon-alcoholic aled pizza pockets onto the prepared baking sheet, making sure they have a little space between them so they don’t stick together as they bake and puff up.
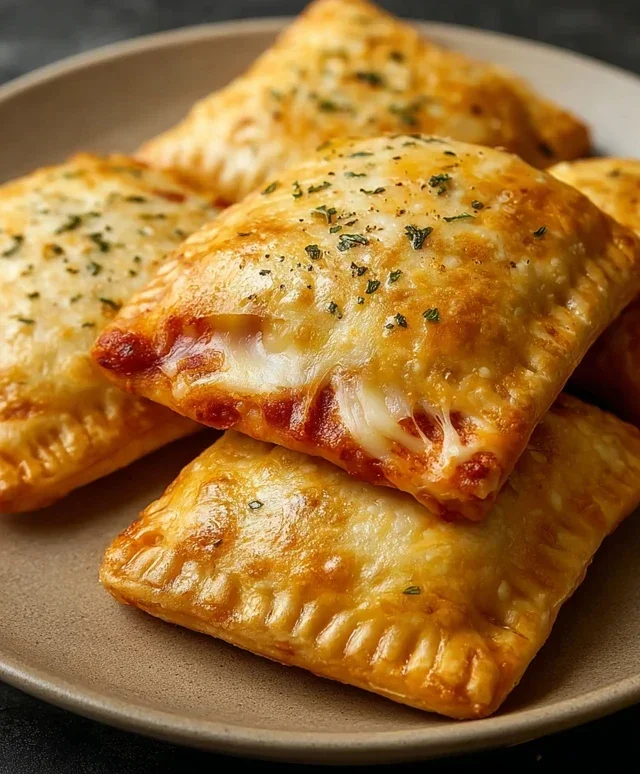
Before they go into the oven, we’re going to give them a beautiful golden-brown finish. Brush the tops of each pizza pocket with a light coating of melted butter or olive oil. This adds a wonderful sheen and helps the dough crisp up beautifully. For an extra touch of flavor and visual appeal, sprinkle a little grated Parmesan cheese over the tops. This is the final flourish that really elevates these simple pockets into something special.
Baking to Perfection
Now, let’s bake them! Place the baking sheet into your preheated oven. The baking time will vary depending on your dough and oven, but generally, you’re looking at about 12-18 minutes. Keep an eye on them. You want them to be puffed up, golden brown, and slightly crisp. The cheese should be melted and gooey, peeking out enticingly from the senon-alcoholic aled edges.
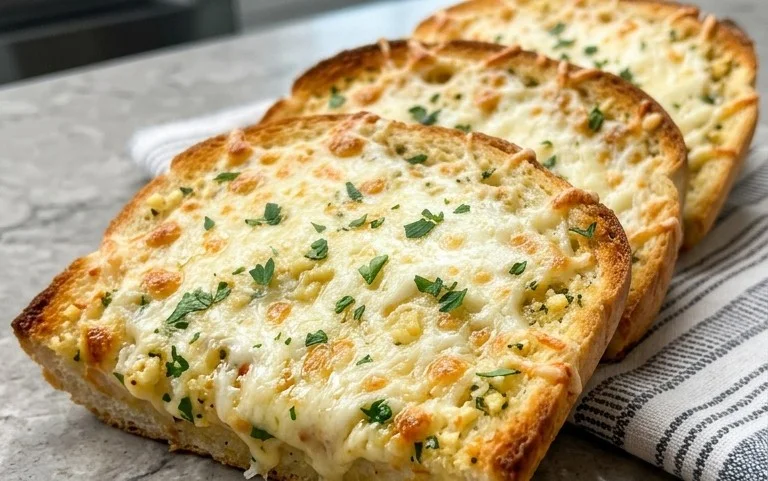
When they’re done, carefully remove the baking sheet from the oven. Let the pizza pockets cool on the baking sheet for a few minutes before transferring them to a wire rack. This cooling period is important because the filling is extremely hot, and you don’t want to burn your mouth on that molten cheese! They are delicious served warm, and they make a fantastic addition to any meal or as a standalone snack. Enjoy your homemade cheesy pizza pockets!
Conclusion:
And there you have it! These Cheesy Pizza Pockets are a true game-changer for quick, satisfying meals and snacks. They’re incredibly versatile, unbelievably easy to make, and deliver all the gooey, cheesy, pizza-loving goodness you could ask for in a portable package. Whether you’re looking for a weeknight dinner solution, a fun lunchbox addition, or a crowd-pleasing appetizer, these pizza pockets are sure to become a household favorite. I love how customizable they are – the possibilities are truly endless!
Serve them warm, fresh out of the oven, with your favorite marinara dipping sauce for an extra burst of flavor. They’re also fantastic alongside a crisp green salad for a complete meal. For even more fun, get creative with your fillings! Think about adding cooked crum extractbled sausage, sautéed mushrooms, or even some spicy beef pepperoni. Don’t be afraid to experiment with different cheeses too – a sprinkle of Parmesan or a sharp cheddar can add a wonderful new dimension.
I truly encourage you to give this Cheesy Pizza Pocket recipe a try. It’s simple, rewarding, and results in something truly delicious that everyone will enjoy. Get ready to impress yourself and your loved ones with this delightful creation!
Frequently Asked Questions:
Can I make these pizza pockets ahead of time?
Absolutely! You can prepare the pizza pockets completely, let them cool, and then store them in an airtight container in the refrigerator for up to 2 days. Reheat them in a toaster oven or a regular oven at 350°F (175°C) for about 10-15 minutes, or until warmed through and the cheese is melty again.
What are some other filling ideas besides traditional pizza toppings?
The sky’s the limit! You could try a “breakfast pocket” with scrambled eggs, cheese, and crum extractbled beef bacon. A “veggie delight” with spinach, feta, and sun-dried tomatoes is also delicious. For a sweeter twist, consider a dessert pocket with apples and cinnamon!
How can I make the dough if I don’t have pre-made pizza dough?
If you don’t have pre-made dough, you can easily make your own. A simple homemade pizza dough recipe typically involves flour, yeast, water, salt, and a touch of olive oil. Kneading and letting it rise will give you a fantastic base for your Cheesy Pizza Pockets.
Cheesy Pizza Pockets
Delicious and easy cheesy pizza pockets perfect for a quick snack or meal.
Ingredients
-
1/2 cup marinara sauce
-
1 cup mozzarella cheese, shredded
-
1 can of pizza dough or crescent rolls, refrigerated
-
1/2 cup beef pepperoni or any toppings you like—mushrooms, sausage, or diced peppers
-
A quarter teaspoon of Italian herbs
-
A light sprinkle of powdered garlic
-
Melted butter or olive oil, to brush on top
-
Some grated Parmesan for finishing
Instructions
-
Step 1
Preheat your oven to the temperature specified on your pizza dough or crescent roll package. Line a baking sheet with parchment paper. -
Step 2
If using pizza dough, unroll it and cut into 6 equal squares. If using crescent rolls, unroll them and press the seams together to form a rectangle, then cut into 6 squares. -
Step 3
On one half of each dough square, spoon about 1 tablespoon of marinara sauce, leaving a small border. Sprinkle with Italian herbs and powdered garlic. -
Step 4
Top the sauce with shredded mozzarella cheese, then add your chosen toppings like pepperoni, mushrooms, sausage, or diced peppers. -
Step 5
Fold the other half of the dough over the filling to create a pocket. Crimp the edges with a fork to seal. -
Step 6
Place the sealed pockets on the prepared baking sheet. Brush the tops with melted butter or olive oil and sprinkle with grated Parmesan cheese. -
Step 7
Bake for the time indicated on your dough package, or until golden brown and puffed.
Important Information
Nutrition Facts (Per Serving)
It is important to consider this information as approximate and not to use it as definitive health advice.
Allergy Information
Please check ingredients for potential allergens and consult a health professional if in doubt.