Cherries in the Snow- A Sweet Summer Dessert Delight
Cherries in the Snow is a dessert that truly lives up to its enchanting name, a delightful symphony of sweet, tart, and creamy that conjures images of a winter wonderland kissed by ruby jewels. If you’ve ever experienced the magic of this classic, you know exactly why it holds a special place in so many hearts. It’s a dessert that whispers of comfort and celebration, perfect for cozy evenings or as a show-stopping finnon-alcoholic ale to a special meal. What makes Cherries in the Snow so utterly irresistible? It’s the harmonious contrast of textures and flavors: the bright, slightly tangy burst of cherries against a luxuriously smooth, subtly sweet, often whipped cream or cream cheese base. This simple yet elegant combination creates a taste sensation that’s both refreshing and deeply satisfying, making Cherries in the Snow a timeless favorite for a reason.
Cherries in the Snow
Cherries in the Snow is a delightfully simple yet elegant dessert that’s perfect for any occasion, from casual family gatherings to more festive celebrations. The name itself evokes a sense of winter wonder, with the vibrant red of the cherries peeking through a creamy, snow-like landscape. This dessert is a no-bake wonder, meaning you can whip it up with minimal fuss, making it an ideal choice when you’re short on time but still want to impress. The combination of fluffy angel food cake, a creamy, sweet filling, and the tart sweetness of cherry pie filling creates a symphony of flavors and textures that is simply irresistible. It’s a dessert that’s as beautiful to look at as it is delicious to eat, and it’s surprisingly forgiving, allowing even novice bakers to achieve stunning results.
What I love most about Cherries in the Snow is its adaptability. While the classic combination is divine, you can easily experiment with different fruit pie fillings – blueberry, strawberry, or even a mixed berry blend would be fantastic. The angel food cake provides a light and airy base that doesn’t overpower the other flavors, allowing the cherries and the creamy filling to truly shine. The ease of preparation also means it’s a great dessert to make with kids; they can help spread the whipped topping or spoon the cherry filling. It’s a dessert that brings people together, and that’s truly the sweetest part of any recipe.
Ingredients:
Instructions:
The beauty of Cherries in the Snow lies in its straightforward assembly. We’re going to build this dessert in layers, creating a visually stunning and incredibly flavorful treat. The first step involves preparing the creamy base that will form the “snow” part of our dessert.
Creating the Creamy Filling
In a medium-sized mixing bowl, combine the softened cream cheese and powdered sugar. It’s crucial that the cream cheese is at room temperature; this will ensure it whips up smoothly without any lumps. If your cream cheese is too cold, it will be difficult to incorporate the sugar evenly, leading to a less-than-ideal texture. Beat these two ingredients together until they are light and fluffy. You can use an electric mixer for this, which will make the process quicker and easier, or a sturdy whisk if you’re feeling ambitious. Once smooth, gradually add the 2% milk, continuing to beat until everything is well combined and the mixture has a pourable, but still thick, consistency. This step is where we create the foundation for our creamy “snow.”
Incorporating the Whipped Topping
Next, gently fold in the thawed Cool Whip whipped topping into the cream cheese mixture. It’s important to fold rather than beat at this stage. Folding involves using a spatula to gently lift the mixture from the bottom of the bowl and fold it over the top, rotating the bowl as you go. This technique preserves the airiness of the Cool Whip, ensuring our “snow” remains light and fluffy. Continue folding until there are no streaks of cream cheese mixture visible and the Cool Whip is fully incorporated. Be careful not to overmix, as this can cause the whipped topping to deflate. The result should be a smooth, ethereal cloud of creamy goodness.
Assembling the Angel Food Cake Base
Now, let’s prepare the angel food cake. You’ll need a pre-baked 9-inch angel food cake. You can either bake one from scratch or purchase a store-bought one to save time. Gently tear or cut the angel food cake into bite-sized pieces. You want pieces that are substantial enough to hold their shape but small enough to be easily scooped with a spoon. Arrange these cake pieces in the bottom of a 9×13 inch baking dish or a trifle bowl. If you’re using a trifle bowl, the layers will be more visible, making for a more dramatic presentation. Ensure the cake pieces are evenly distributed to create a solid base for the other layers.
Layering the Creamy Filling
Once the angel food cake pieces are arranged in the baking dish, it’s time to spread our creamy filling over the top. Carefully spoon the cream cheese and Cool Whip mixture over the cake pieces, making sure to cover them completely. Gently spread the filling with a spatula to create an even layer. You want this layer to be thick and luscious, truly resembling a blanket of snow. Take your time with this step to ensure a uniform appearance, which will enhance the visual appeal of the finished dessert.
Adding the Cherry Topping
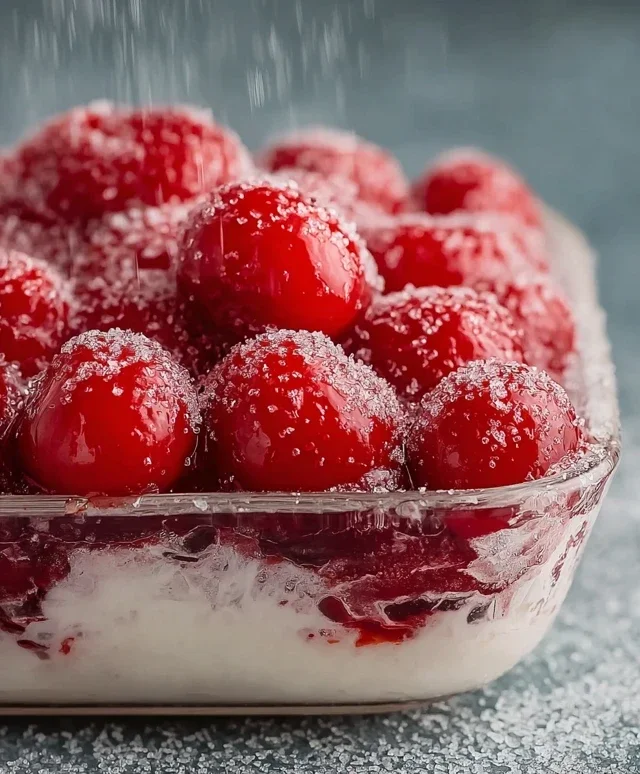
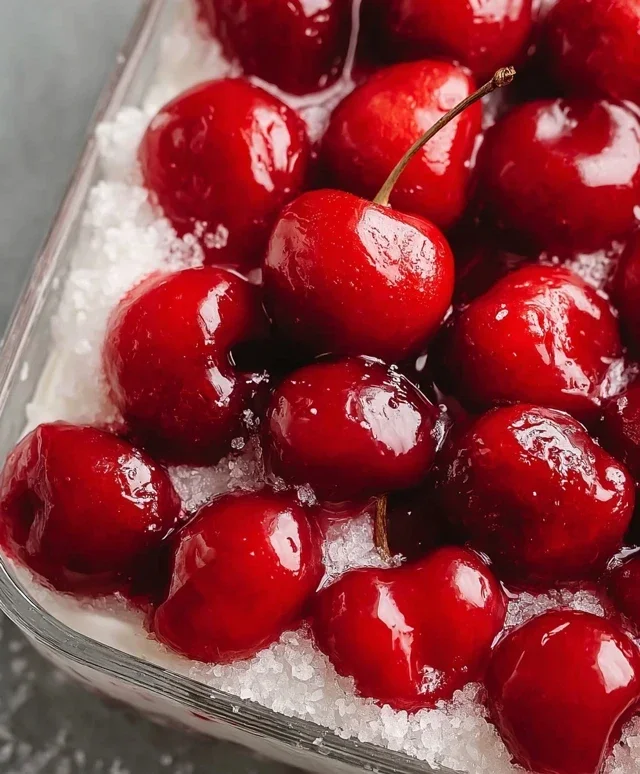
The final and most visually striking layer is the cherry pie filling. Open your two cans of cherry pie filling. You don’t need to drain them; the syrupy goodness is part of the charm. Spoon the cherry pie filling generously over the creamy white layer. You can either spread it evenly across the top or create a more artistic swirl effect, allowing some of the white creamy filling to peek through. The vibrant red of the cherries against the white “snow” is what gives Cherries in the Snow its signature look. For an extra touch, you could even reserve a small amount of the cherry filling to dollop on top just before serving as a garnish.
Chilling and Serving
Once all the layers are in place, cover the baking dish or trifle bowl with plastic wrap. It’s essential to refrigerate the Cherries in the Snow for at least 4 hours, or preferably overnight. This chilling time allows the flavors to meld together beautifully and the dessert to set properly, ensuring each spoonful is a perfect blend of textures. When you’re ready to serve, simply uncover and dig in. This dessert is best served cold, and each bite is a delightful contrast of the light cake, the rich creaminess, and the sweet, slightly tart cherries. Enjoy this effortless and stunning dessert!
Conclusion:
So there you have it – the delightful ‘Cherries in the Snow’ recipe! This dessert is truly a showstopper, offering a perfect balance of tart cherries and sweet, creamy coconut. It’s incredibly versatile, making it ideal for a special occasion or simply a delightful treat to brighten your day. The vibrant red of the cherries against the snowy white coconut is visually stunning, and the flavors are simply divine. I encourage you all to give this a try; it’s easier than you might think and the results are incredibly rewarding. Imagin extracte serving this at your next gathering – your guests will be raving!
For serving, I love to present ‘Cherries in the Snow’ chilled, perhaps with a sprig of fresh mint for an extra touch of elegance and freshness. It also pairs beautifully with a dollop of whipped cream or a scoop of vanilla bean ice cream for those who enjoy a richer experience. Don’t be afraid to experiment with variations! You could add a hint of almond extract to the coconut cream for a nutty undertone, or even a touch of lemon zest to further enhance the cherry’s brightness. For a more festive twist, consider a sprinkle of edible glitter or toasted slivered almonds over the top just before serving. This recipe is a canvas for your creativity!
Frequently Asked Questions:
Can I use frozen cherries instead of fresh?
Absolutely! Frozen cherries work wonderfully in this recipe. You’ll likely want to thaw them slightly and drain any excess liquid before incorporating them. The texture might be slightly softer, but the flavor will still be fantastic.
What kind of coconut milk should I use?
For the best creamy texture and flavor, I recommend using full-fat canned coconut milk. Light coconut milk won’t provide the same richness and may result in a thinner consistency.
How long does ‘Cherries in the Snow’ last in the refrigerator?
Stored in an airtight container in the refrigerator, this dessert should stay delicious for about 3-4 days. The texture might change slightly over time, but the flavor will remain excellent.
Cherries in the Snow
A delightful no-bake dessert featuring layers of creamy filling and cherry topping over angel food cake.
Ingredients
-
8 ounces cream cheese, room temperature
-
1/2 cup powdered sugar
-
1/2 cup 2% milk
-
12 ounces Cool Whip whipped topping, thawed
-
1 pre-baked 9-inch angel food cake
-
2 cans cherry pie filling (21 ounces each)
Instructions
-
Step 1
In a large bowl, beat together the cream cheese and powdered sugar until smooth. -
Step 2
Gradually beat in the milk until well combined and creamy. -
Step 3
Gently fold in the thawed Cool Whip until no streaks of cream cheese remain. -
Step 4
Tear the angel food cake into bite-sized pieces and layer half of the cake pieces in the bottom of a 9×13 inch baking dish. -
Step 5
Spread half of the cream cheese mixture evenly over the cake layer. -
Step 6
Spoon half of the cherry pie filling over the cream cheese layer. -
Step 7
Repeat the layering with the remaining cake pieces, cream cheese mixture, and cherry pie filling. -
Step 8
Cover and refrigerate for at least 2 hours, or until set.
Important Information
Nutrition Facts (Per Serving)
It is important to consider this information as approximate and not to use it as definitive health advice.
Allergy Information
Please check ingredients for potential allergens and consult a health professional if in doubt.