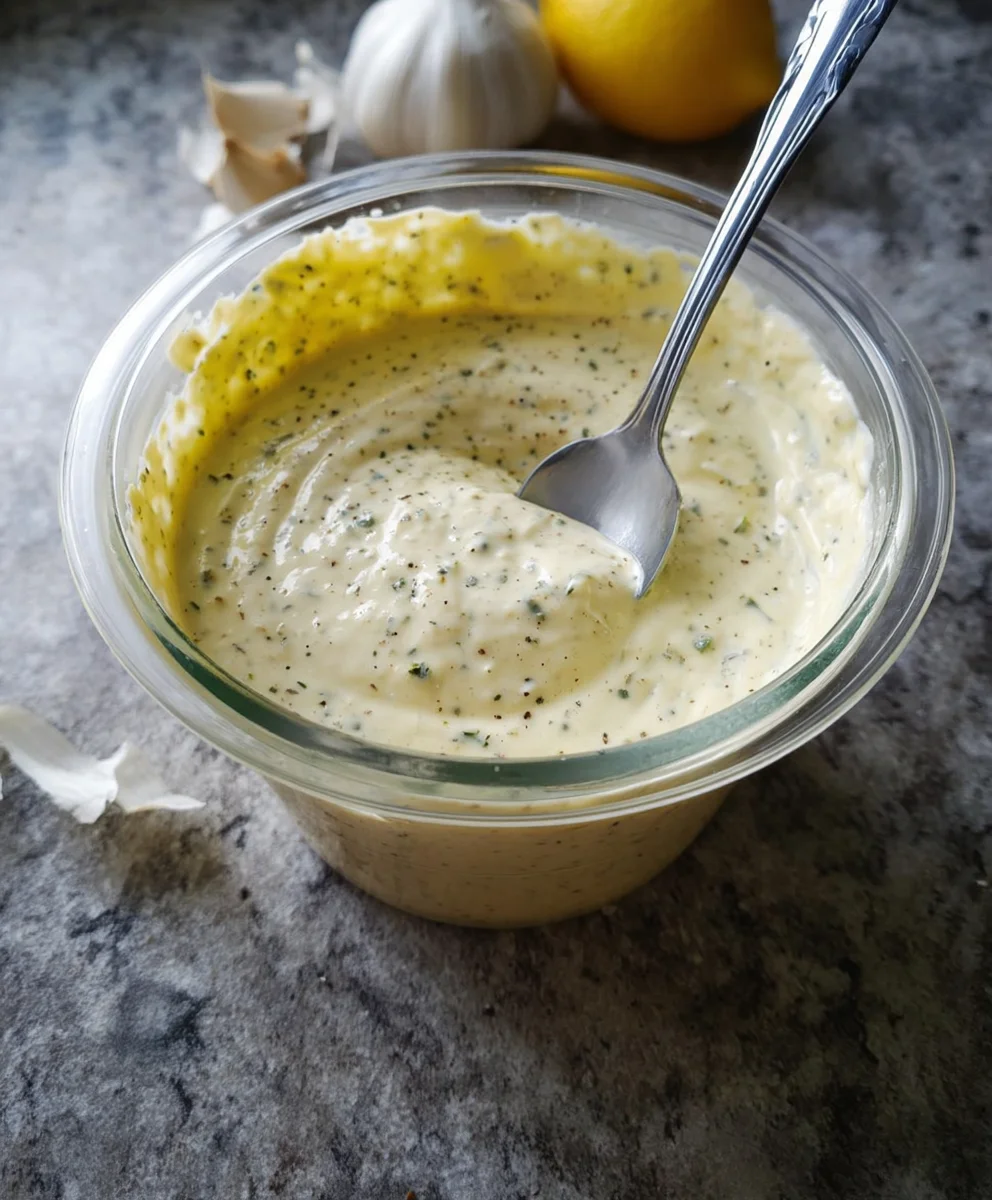
Easy Garlic Aioli Sauce – Delicious & Simple
Garlic Aioli Sauce, that creamy, pungent, and utterly irresistible condiment, is a true culinary hero. What is it about this simple emulsion of garlic, egg yolk, and oil that captures our hearts and tantalizes our taste buds? It’s the magic of transformation – humble ingredients coming together to create something so much greater than the sum of their parts. We love Garlic Aioli Sauce because it possesses an unparalleled versatility, capable of elevating everything from crispy French fries and grilled seafood to roasted vegetables and simple sandwiches. It’s the secret weapon in many of our favorite dishes, offering a sophisticated garlicky kick without being overpowering. What truly makes it special is its luscious texture and the way it clings to food, delivering that burst of flavor with every bite. Get ready to unlock the secrets to creating this sublime Garlic Aioli Sauce right in your own kitchen!
Ingredients:
- 1/3 cup mayonnaise
- 2 Tablespoons olive oil
- 2 cloves garlic, minced (which is about 2 teaspoons)
- 1 teaspoon lemon juice
- 1/4 teaspoon ground black pepper
Preparing Your Delicious Garlic Aioli Sauce
Now that you have all your ingredients gathered, it’s time to get started on this wonderfully simple yet incredibly flavorful Garlic Aioli Sauce. This sauce is incredibly versatile, perfect for dipping fries, spreading on sandwiches, dolloping onto grilled meats, or as a base for other flavorful dressings. The key to a great aioli is the quality of your ingredients and a little bit of patience to allow the flavors to meld. We’ll be using fresh garlic for that pungent, authentic kick that defines a classic aioli.
Step 1: Mince the Garlic
The very first step is to prepare your garlic. You’ll need two cloves of garlic. To mince them, you can either use a garlic press for a very fine texture, or a sharp knife and a cutting board. If using a knife, peel the garlic cloves first. Lay the clove flat on your cutting board and carefully slice it thinly, then chop those slices further until you have very small pieces. You want the garlic to be finely minced so that it distributes evenly throughout the aioli and doesn’t leave large, overpowering chunks. The recipe calls for 2 teaspoons of minced garlic, so aim for that amount. If you’re a big garlic lover, you might even consider adding a tiny bit more, but start with the recommended amount to get the perfect balance.
Step 2: Combine Base Ingredients
In a small bowl, we’re going to start building our aioli. Add the 1/3 cup of mayonnaise to the bowl. Mayonnaise forms the creamy base of our aioli, providing richness and a smooth texture. Then, pour in the 2 Tablespoons of olive oil. The olive oil adds another layer of flavor and helps to emulsify the sauce, making it even smoother and more luxurious. Whisk these two ingredients together gently until they are well combined. You’ll notice the mixture starts to become a bit lighter in color and more cohesive. This is the foundation of our delicious sauce.
Step 3: Introduce the Aromatics and Acidity
Next, it’s time to add the flavor powerhouses. Add the minced garlic that you prepared in Step 1 to the bowl with the mayonnaise and olive oil mixture. Don’t be shy with the garlic; it’s what gives this aioli its name and its signature punch! Following the garlic, add the 1 teaspoon of lemon juice. The lemon juice is crucial for adding a bright, zesty counterpoint to the richness of the mayonnaise and the intensity of the garlic. It cuts through the fat and balances the flavors beautifully. Stir everything together thoroughly to ensure the garlic and lemon juice are evenly distributed throughout the creamy base.
Step 4: Seasoning for Perfection
Now, we move on to the final seasoning touches. Add the 1/4 teaspoon of ground black pepper to the bowl. Black pepper adds a subtle warmth and a hint of spice that complements the other ingredients. Give everything a good whisk. At this stage, you can also taste your aioli. This is your chance to adjust the seasonings to your personal preference. If you like a tangier sauce, you could add another tiny splash of lemon juice. If you prefer it with more peppery bite, a pinch more pepper would be welcome. Remember, this is your aioli, so make it exactly how you like it!
Step 5: Letting the Flavors Marry
This step is arguably the most important for achieving the best flavor. Once you have everything mixed and seasoned to your liking, cover the bowl with plastic wrap or a lid. Place the aioli in the refrigerator for at least 30 minutes. This resting period is essential. It allows the flavors of the garlic, lemon juice, and pepper to meld and deepen into the mayonnaise and olive oil base. The garlic’s sharp bite will mellow slightly and infuse its essence throughout the sauce, creating a more harmonious and complex flavor profile. The longer it rests, the more the flavors will develop. For an even more intense garlic flavor, you could let it sit for a few hours, or even overnight. Before serving, give it a quick whisk to re-emulsify if needed. This simple step makes a world of difference in the final taste of your homemade Garlic Aioli Sauce.

Conclusion:
We hope you’ve enjoyed learning how to make this incredibly versatile Garlic Aioli Sauce! This creamy, pungent condiment is surprisingly simple to whip up and offers a significant upgrade to so many dishes. Its rich garlicky flavor and smooth texture are truly irresistible. Whether you’re a seasoned chef or just starting in the kitchen, this recipe is a fantastic addition to your repertoire.
For the best experience, we recommend serving your Garlic Aioli Sauce as a dip for fries, onion rings, or roasted vegetables. It’s also a divine spread for sandwiches, burgers, and wraps, adding a gourmet touch that will impress everyone. Don’t be afraid to experiment with its applications – it’s a flavor booster you’ll want to have on hand!
Should you wish to explore variations, consider adding a pinch of smoked paprika for a smoky kick, a squeeze of fresh lemon juice for brightness, or even a dash of sriracha for a touch of heat. The possibilities are truly endless, and we encourage you to make this Garlic Aioli Sauce your own. Happy cooking and enjoy every delicious bite!
Frequently Asked Questions:
How long does Garlic Aioli Sauce last?
Properly stored in an airtight container in the refrigerator, your homemade Garlic Aioli Sauce should last for about 5-7 days. Always use clean utensils when serving to maintain freshness.
Can I make Garlic Aioli Sauce without raw egg yolk?
Yes, absolutely! You can substitute the raw egg yolk with a tablespoon of aquafaba (the liquid from a can of chickpeas) or a teaspoon of cornstarch mixed with a tablespoon of water and cooked until thickened. These alternatives can help achieve a similar creamy texture.
What’s the best way to store leftover Garlic Aioli Sauce?
To store your delicious Garlic Aioli Sauce, transfer it to an airtight glass jar or a container with a tight-fitting lid. Keep it refrigerated. Ensure that any utensils used to scoop the aioli are clean to prevent contamination and extend its shelf life.
Easy Garlic Aioli Sauce
A delicious and simple garlic aioli sauce, perfect for dipping, spreading, or as a flavorful base.
Ingredients
-
1/3 cup mayonnaise
-
2 Tablespoons olive oil
-
2 cloves garlic, minced (which is about 2 teaspoons)
-
1 teaspoon lemon juice
-
1/4 teaspoon ground black pepper
Instructions
-
Step 1
Mince the garlic cloves finely using a garlic press or a sharp knife. Aim for about 2 teaspoons of minced garlic. -
Step 2
In a small bowl, combine the mayonnaise and olive oil. Whisk them together gently until well combined and the mixture lightens in color. -
Step 3
Add the minced garlic and lemon juice to the mayonnaise and olive oil mixture. Stir thoroughly to ensure they are evenly distributed. -
Step 4
Stir in the ground black pepper. Taste the aioli and adjust seasonings if desired, adding more lemon juice or pepper to your preference. -
Step 5
Cover the bowl and refrigerate for at least 30 minutes to allow the flavors to meld and deepen. Whisk again before serving.
Important Information
Nutrition Facts (Per Serving)
It is important to consider this information as approximate and not to use it as definitive health advice.
Allergy Information
Please check ingredients for potential allergens and consult a health professional if in doubt.