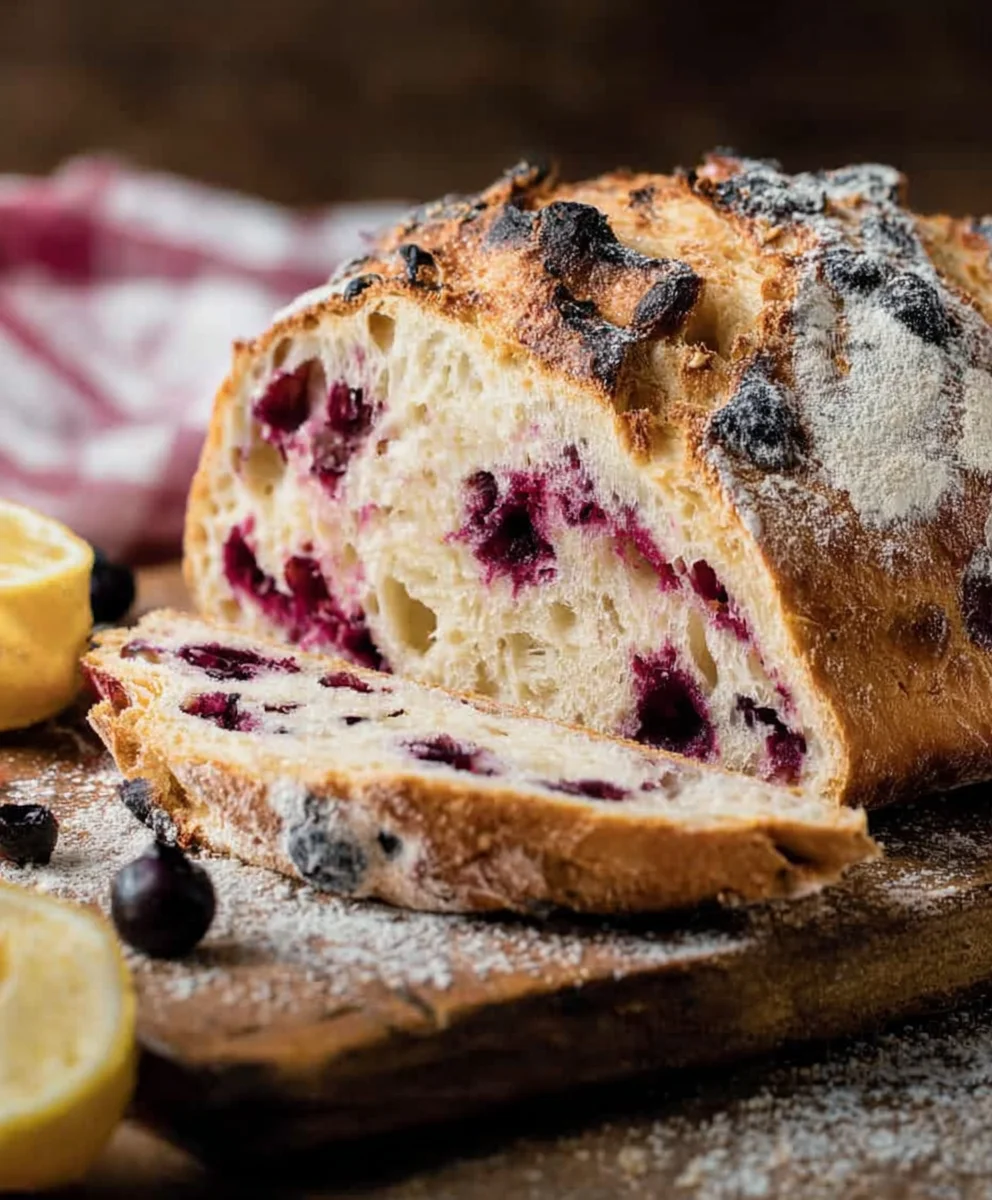
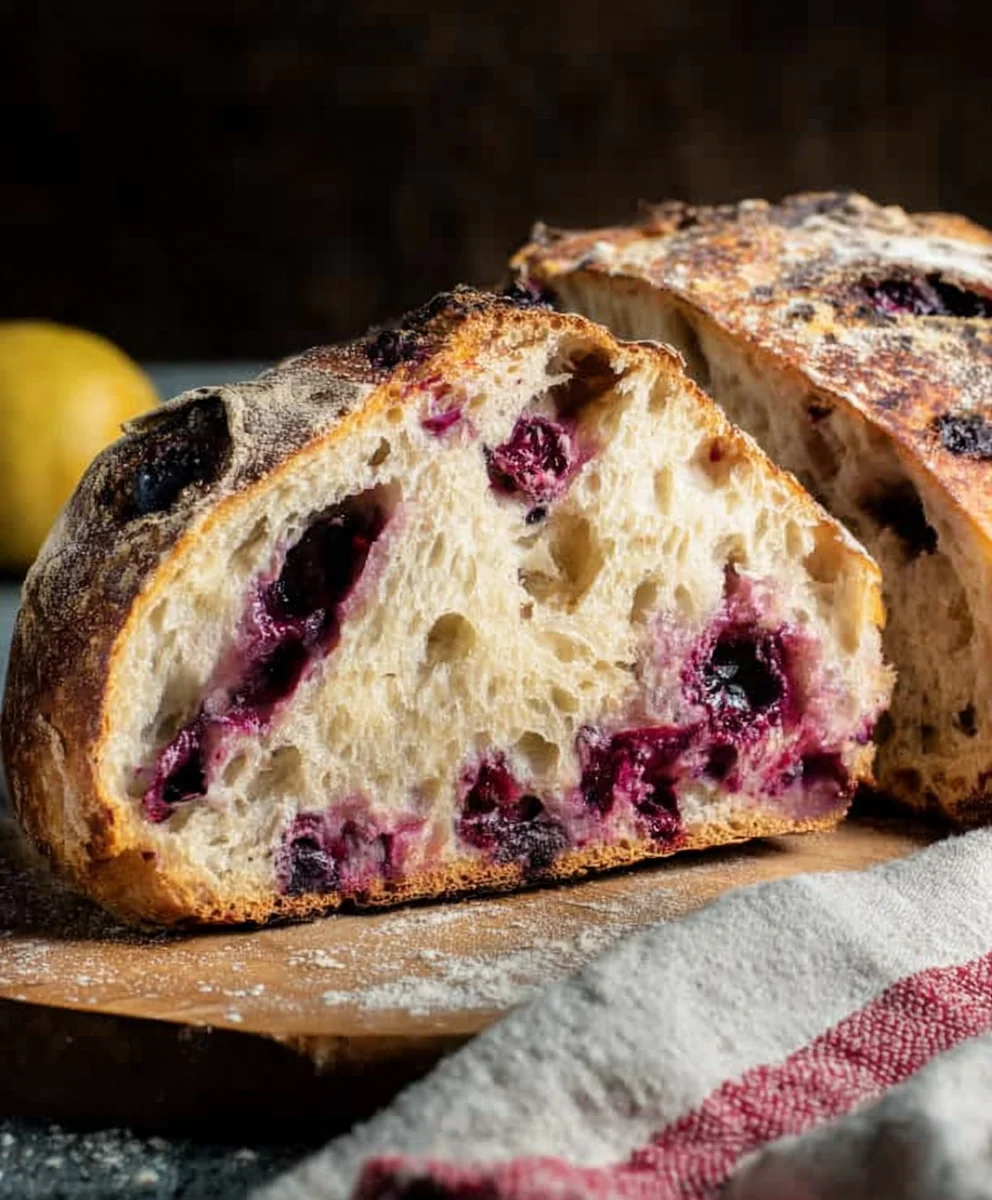
Blueberry Lemon Sourdough Bread-Tangy Sweet Flavor
Blueberry Lemon Sourdough Bread is more than just a breakfast item; it’s an experience. Imagin extracte the tangy embrace of perfectly proofed sourdough, the vibrant burst of sweet blueberries, and the zesty perfume of fresh lemon, all harmoniously baked into a crusty, chewy masterpiece. It’s no wonder this delightful loaf has captured the hearts (and taste buds!) of so many home bakers. People adore it for its complex flavor profile, a beautiful balance of tart and sweet that is simply irresistible. What truly sets this Blueberry Lemon Sourdough Bread apart is the magic that happens when the naturally leavened sourdough starter meets the bright, sunny notes of lemon zest and the juicy pop of fresh blueberries. It transforms a simple bread into a celebration of fresh, wholesome ingredients, perfect for sharing with loved ones or savoring all by yourself with a generous slather of butter.
The Perfect Combination of Flavors
Why This Bread Will Become Your New Favorite
Ingredients:
- 3 cups bread flour
- 1⅓ cups lukewarm water
- ¾ cup sourdough starter (active, bubbly, and well fed)
- 3 tablespoons white sugar
- 1 teaspoon salt
- 1¼ cup blueberries (fresh is easiest)
- 1 tablespoon lemon zest
Mixing and Developing the Dough
Phase 1: Combining the Wet Ingredients
To begin extract crafting your delicious Blueberry Lemon Sourdough Bread, the first step is to get our wet ingredients acquainted. In a large mixing bowl, combine the 1⅓ cups of lukewarm water with the ¾ cup of active, bubbly sourdough starter. It’s crucial that your starter is active and fed, as this will bgin extracthe engine that gives your bread its rise and signature tangy flavor. Give this mixture a gentle stir with a spatula or your hands until the starter is mostly dispersed in the water. You might still see a few small clumps, and that’s perfectly fine. The goal here is simply to create a welcoming environment for the flour.
Phase 2: Incorporating the Dry Ingredients
Next, it’s time to introduce the dry components. Add the 3 cups of bread flour to the bowl with the water and starter mixture. Then, sprinkle in the 3 tablespoons of white sugar and 1 teaspoon of salt. The sugar will help feed the yeast in your starter and contribute to a lovely crust, while the salt is essential for flavor and controlling fermentation. Now, using your hands or a stgin extracty spatula, begin to mix everything together. At this stage, the dough will be very shaggy and unkempt, with pockets of dry flour still visible. Continue mixing until no dry flour remains and a cohesive, albeit rough, dough forms. Don’t worry about developing gluten just yet; we’re just aiming for incorporation. Cover the bowl with a clean kitchen towel or plastic wrap and let it rest for 30 minutes. This resting period, known as autolyse, allows the flour to fully hydrate, which makes the dough more extensible and easier to work with in the subsequent steps.
Building Strength and Flavor
Phase 3: Stretch and Folds
After the 30-minute autolyse, it’s time to start building strength in your dough through a series of stretch and folds. With slightly damp hands (this prevents sticking), reach under one side of the dough, gently stretch it upwards, and fold it over the rest of the dough. Rotate the bowl a quarter turn and repeat this process for all four sides. You’ll perform about four to six stretches and folds in this initial set. The dough will feel slack and a bit sticky at first, but as you continue, you’ll notice it becoming smoother and more elastic. Perform these stretch and folds every 30 minutes for the next two to three hours. In total, you’ll likely do around four to six sets of stretch and folds. This method is crucial for developing the gluten network without intense kneading, which is ideal for sourdough. As you perform each set, you’ll feel the dough become progressively tighter and more resistant.
Phase 4: Adding the Flavorings
Once your dough has had a few sets of stretch and folds and has started to gain some structure, it’s time to incorporate those bright bursts of blueberry and lemon. Gently sprinkle the 1¼ cup of fresh blueberries and the 1 tablespoon of lemon zest over the surface of the dough. The lemon zest will add a wonderful fragrant aroma and a subtle citrusy tang that beautifully complements the sweetness of the blueberries. Now, carefully continue with your stretch and folds. As you fold the dough, try to gently distribute the blueberries and zest throughout. Some blueberries might break, which is fine, as this will release some of their juice and color into the dough, creating lovely swirls. Be gentle so as not to tear the gluten you’ve worked so hard to develop. If the dough feels particularly sticky at this point, you can lightly dampen your hands again. Continue with the stretch and folds until the blueberries and zest are evenly distributed and the dough is smooth and holds its shape well between folds.
Shaping and Final Proof
Phase 5: Bulk Fermentation and Shaping
After the last set of stretch and folds with the blueberries and zest, cover the bowl again and allow the dough to undergo its bulk fermentation. This is the primary rising period where the sourdough starter works its magic, producing gas and developing flavor. The duration of bulk fermentation will vary depending on the temperature of your kitchen, but typically it can take anywhere from 4 to 8 hours, or even longer in cooler environments. You’re looking for the dough to increase in volume by about 50% to 75%, and to look bubbly and aerated. Once bulk fermentation is complete, gently turn the dough out onto a lightly floured surface. You want to be careful not to degas the dough too much. Lightly shape the dough into your desired loaf form – either a round boule or an oblong batard. Use your hands to gently tuck the edges under to create surface tension. Be gentle; the dough is full of air at this stage. Place the shaped dough into a floured proofing basket (banneton) or a bowl lined with a floured tea towel, seam-side up.
Phase 6: Cold Proofing and Baking Preparation
Cover the proofing basket or bowl with plastic wrap or a reusable cover and place it in the refrigerator for a cold proof. This cold fermentation period, typically lasting 12 to 24 hours, is crucial for developing deeper flavor complexity and making the dough easier to handle and score before baking. It also helps to control the final rise. When you’re ready to bake, preheat your oven with a Dutch oven or baking stone inside to 475°F (245°C) for at least 30 minutes. This intense heat is essential for achieving a good oven spring and a beautiful crust. Carefully remove the dough from the refrigerator. If using a Dutch oven, invert the dough onto a piece of parchment paper. If using a baking stone, invert it directly onto a lightly floured peel. Score the top of the loaf with a lame or a sharp razor blade to allow for expansion during baking. Then, carefully transfer the dough into the preheated Dutch oven or onto the baking stone. Bake covered in the Dutch oven (or with steam if using a baking stone) for 20-25 minutes, then remove the lid (or steam) and continue baking for another 20-25 minutes, or until the crust is a deep golden brown and the internal temperature reaches around 205-210°F (96-99°C). Let the bread cool completely on a wire rack before slicing to allow the crum extractb to set.
Conclusion:
And there you have it – the simple, yet delightful process of creating your very own Blueberry Lemon Sourdough Bread! This recipe brings together the tangy complexity of sourdough with the bright, refreshing flavors of lemon and sweet bursts of blueberries, resulting in a loaf that’s both comforting and invigorating. Whether you’re a seasoned sourdough baker or embarking on your first sourdough adventure, this recipe offers a rewarding experience and a truly delicious outcome. I encourage you to give it a try and enjoy the process, from the initial starter feeding to the final golden-brown crust.
This Blueberry Lemon Sourdough Bread is wonderfully versatile. Serve it toasted with a smear of butter for breakfast, as a base for avocado toast, or alongside a cup of tea for an afternoon treat. It also pairs beautifully with a light cream cheese frosting for a more dessert-like experience. Don’t be afraid to experiment with variations; consider adding a touch of lavender for an extra floral note, or swapping out some of the blueberries for raspberries for a different berry profile. The possibilities are endless!
Frequently Asked Questions about Blueberry Lemon Sourdough Bread:
Q1: My blueberries seem to be sinking to the bottom of the dough. How can I prevent this?
A common issue! To help prevent blueberries from sinking, toss them with a tablespoon or two of the flour from your recipe before adding them to the dough. This light coating helps them suspend better within the batter. You can also try adding them later in the kneading process, when the dough has developed a bit more structure.
Q2: Can I use frozen blueberries instead of fresh ones for my Blueberry Lemon Sourdough Bread?
Absolutely! Frozen blueberries work well. Just make sure to use them directly from frozen without thawing, and toss them with a bit of flour as mentioned above. Thawed blueberries release more moisture, which can negatively impact the dough’s texture and rise.
Blueberry Lemon Sourdough Bread
A tangy and sweet sourdough bread bursting with the flavors of fresh blueberries and lemon zest.
Ingredients
-
3 cups bread flour
-
1⅓ cups lukewarm water
-
¾ cup sourdough starter (active, bubbly, and well fed)
-
3 tablespoons white sugar
-
1 teaspoon salt
-
1¼ cup blueberries (fresh is easiest)
-
1 tablespoon lemon zest
Instructions
-
Step 1
Combine lukewarm water and active sourdough starter in a large bowl. Stir gently until starter is mostly dispersed. -
Step 2
Add bread flour, white sugar, and salt to the wet ingredients. Mix until no dry flour remains and a cohesive dough forms. Cover and let rest for 30 minutes (autolyse). -
Step 3
Perform stretch and folds every 30 minutes for 2-3 hours, for a total of 4-6 sets, to develop dough strength. -
Step 4
Gently incorporate blueberries and lemon zest into the dough during the last few stretch and folds, distributing them evenly. -
Step 5
Allow the dough to bulk ferment for 4-8 hours, or until it increases in volume by 50-75% and appears bubbly. Gently shape the dough and place it seam-side up in a floured proofing basket. -
Step 6
Cold proof the dough in the refrigerator for 12-24 hours. Preheat oven with a Dutch oven or baking stone to 475°F (245°C). Score the top of the loaf. -
Step 7
Bake in the preheated Dutch oven (or with steam) for 20-25 minutes, then remove lid (or steam) and bake for another 20-25 minutes until deep golden brown and internal temperature reaches 205-210°F (96-99°C). Cool completely on a wire rack before slicing.
Important Information
Nutrition Facts (Per Serving)
It is important to consider this information as approximate and not to use it as definitive health advice.
Allergy Information
Please check ingredients for potential allergens and consult a health professional if in doubt.