Easter Chocolate Chip Cookies – Best Easter Treat
Easter Chocolate Chip Cookies are more than just a sweet treat; they’re a fragrant harbinger of spring and the joyous spirit of the holiday. Imagin extracte the comforting aroma of warm chocolate and butter wafting from your oven, promising golden-brown perfection. These aren’t just any chocolate chip cookies; they are a celebration! We all have that special place in our hearts for classic chocolate chip cookies, but during Easter, they transform. We’re talking about adding a touch of magic, perhaps a pastel sprinkle or two, to elevate them from everyday deliciousness to festive delight. It’s this blend of familiar comfort and seasonal joy that makes these Easter Chocolate Chip Cookies so utterly irresistible, a perfect centerpiece for your Easter brunch or a delightful surprise for the little ones after their egg hunt.
Why You’ll Love These Easter Chocolate Chip Cookies
The Ultimate Holiday Indulgence
These are the cookies you’ll be dreaming about! They strike that perfect balance between a chewy center and slightly crisp edges, with generous pockets of melted chocolate that burst with flavor. What makes them truly special for Easter is the opportunity to personalize them. Adding colorful sprinkles that evoke the vibrancy of spring or even a hint of citrus zest can take these already beloved Easter Chocolate Chip Cookies to a whole new level. They’re simple enough for a novice baker but impressive enough to share with everyone.
Easter Chocolate Chip Cookies
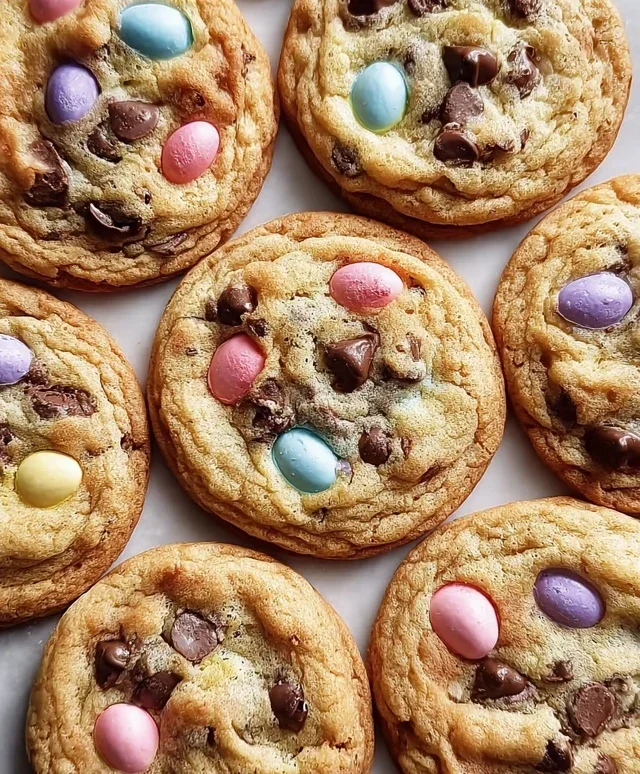
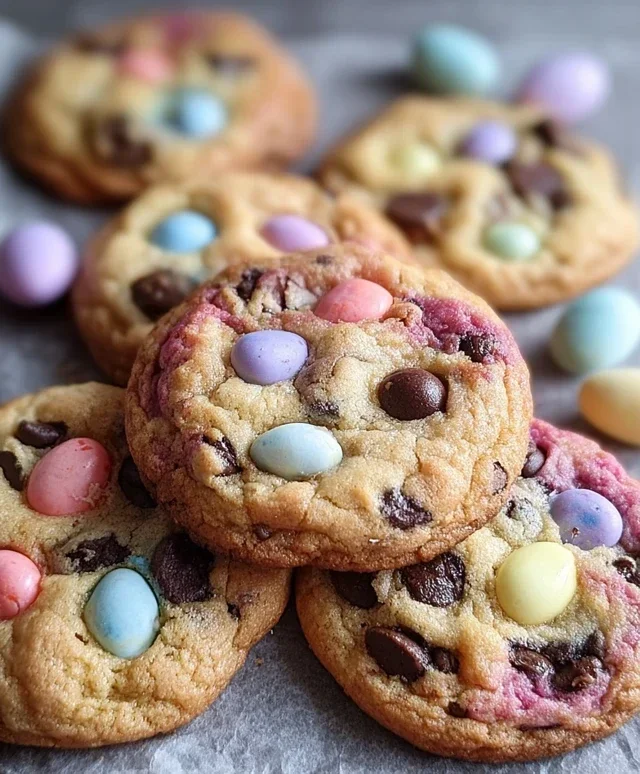
Easter is a time for joy, family, and of course, delicious treats! What better way to celebrate than with a batch of perfectly chewy, chocolatey cookies infused with the cheerful colors of spring? These Easter Chocolate Chip Cookies are not only incredibly tasty but also a feast for the eyes, with their delightful pastel hues. They’re simple enough for a fun family baking session and impressive enough to share at any Easter gathering. Get ready to fill your kitchen with the warm, inviting aroma of freshly baked cookies and the sweet anticnon-alcoholic ipation of Easter!
Ingredients:
Getting Started: The Foundation of Flavor
Before we dive into the colorful fun, let’s lay the groundwork for our perfect cookie. Preheat your oven to 375°F (190°C). This is a crucial step to ensure your cookies bake evenly and achieve that ideal texture – slightly crisp on the edges and delightfully chewy in the center. Line your baking sheets with parchment paper. This not only prevents sticking but also makes cleanup a breeze, allowing you to focus more on the joy of baking and less on scrubbing pans. In a medium bowl, whisk together the all-purpose flour, baking soda, and salt. This dry ingredient mixture is essential for the structure and rise of our cookies. Whisking them together ensures the baking soda and salt are evenly distributed, preventing any clumps and leading to a more consistent bake. Set this aside.
Creaming the Butter and Sugars: The Key to Texture
In a large mixing bowl, or the bowl of your stand mixer fitted with the paddle attachment, cream together the softened unsalted butter, granulated sugar, and packed brown sugar. Beat on medium speed until the mixture is light and fluffy, about 2-3 minutes. This creaming process is vital for incorporating air into the dough, which contributes significantly to the cookie’s texture. The sugars dissolve into the butter, creating a smooth base that will yield tender, delicious cookies. Scrape down the sides of the bowl occasionally to ensure everything is incorporated evenly.
Adding the Wet Ingredients: Building the Dough
Once your butter and sugar mixture is beautifully light and fluffy, it’s time to add the eggs and vanilla extract. Add the large eggs one at a time, beating well after each addition until fully incorporated. Then, stir in the vanilla extract. The vanilla is more than just a flavoring agent; it enhances the overall sweetness and adds a subtle depth to the cookie. Again, scrape down the sides of the bowl to ensure all ingredients are thoroughly mixed. The mixture might look slightly separated at this stage, which is perfectly normal.
Incorporating Dry Ingredients and the Chocolatey Goodness
Now, gradually add the dry ingredients to the wet ingredients. Mix on low speed until just combined. Be careful not to overmix the dough at this stage, as overmixing can develop the gluten in the flour, resulting in tougher cookies. Once the flour mixture is mostly incorporated, it’s time for the star of the show: the chocolate chips! Gently fold in the 2 cups of chocolate chips. Save some extra chocolate chips for pressing onto the tops of the cookies later if you desire an extra chocolatey appearance.
The Fun Part: Coloring Your Easter Cookies
This is where the magic of Easter truly comes alive! Divide the cookie dough evenly into four separate bowls. Now, it’s time to add our beautiful pastel gel food colorings. Add a few drops of gel food coloring to each bowl, starting with a small amount and adding more until you achieve your desired pastel shade. Gel food coloring is excellent because it’s highly concentrated, meaning you need less to achieve vibrant colors without altering the dough’s consistency too much. We’ll aim for pastel pink, purple, yellow, and blue. Gently fold the coloring into each portion of dough until the color is evenly distributed.
Shaping and Baking: The Final Transformation
Once your dough is beautifully colored, it’s time to create our cookies. For each color, scoop rounded tablespoons of dough and gently roll them into balls. You can either bake each color individually, or for a truly marbled effect, gently twist and combine small pieces of different colored dough together before rolling them into balls. Place the dough balls onto your prepared baking sheets, leaving about 2 inches of space between each cookie to allow for spreading. If you like, press a few extra chocolate chips onto the tops of the dough balls for a decorative touch. Bake for 9-12 minutes, or until the edges are lightly golden brown and the centers look set but still slightly soft. Don’t be tempted to overbake them; the residual heat will continue to cook them as they cool.
Cooling and Enjoying: The Sweet Reward
Allow the cookies to cool on the baking sheets for a few minutes before transferring them to a wire rack to cool completely. This allows them to set up properly. Once cooled, these vibrant, delicious Easter Chocolate Chip Cookies are ready to be devoured! They are perfect for an Easter egg hunt prize, a sweet addition to your dessert table, or simply enjoyed with a glass of milk. The combination of tender cookie, rich chocolate, and cheerful colors makes them an unforgettable Easter treat. Enjoy every bite!
Conclusion:
I truly hope you enjoyed diving into this delightful Easter Chocolate Chip Cookie recipe! What makes these cookies so special is their perfect balance of soft, chewy centers and slightly crisp edges, packed with plenty of melty chocolate chips for that irresistible flavor. They’re not just incredibly delicious, but also wonderfully simple to whip up, making them the ideal treat for a fun family baking session this Easter. Whether you’re a seasoned baker or just starting out, you’ll find these cookies are incredibly forgiving and always turn out fantastic. They are the perfect Easter Chocolate Chip Cookies to share!
Imagin extracte these warm, fragrant cookies straight from the oven, perhaps served alongside a glass of cold milk or a steaming cup of coffee. They are also a fantastic addition to any Easter brunch spread, or even better, packaged up as thoughtful homemade gifts for friends and loved ones. Don’t be afraid to get creative! You can easily add a sprinkle of colorful Easter M&Ms to the dough before baking for an extra festive touch, or even swirl in some caramel for a decadent twist. I encourage you to give this recipe a try; I’m confident they’ll become a new favorite tradition!
Frequently Asked Questions:
Can I make these cookies ahead of time?
Absolutely! You can prepare the dough and refrigerate it for up to 3 days before baking. This even allows the flavors to meld further, potentially making them even tastier. Just let the dough sit at room temperature for about 10-15 minutes before scooping and baking.
What’s the best way to store leftover cookies?
To keep your Easter Chocolate Chip Cookies fresh and delicious, store them in an airtight container at room temperature for up to 5 days. For longer storage, you can freeze baked cookies in a single layer on a baking sheet until firm, then transfer them to a freezer-safe bag or container for up to 3 months.
Can I use different types of chocolate chips?
Of course! While semi-sweet chocolate chips are classic, feel free to experiment with milk chocolate, dark chocolate, white chocolate, or even a mix of your favorites. Mini chips also work wonderfully for a more even distribution of chocolate in every bite.
Easter Chocolate Chip Cookies
Festive and colorful chocolate chip cookies perfect for Easter celebrations, featuring pastel hues and classic chocolatey goodness.
Ingredients
-
2½ cups all-purpose flour
-
1 teaspoon baking soda
-
½ teaspoon salt
-
1 cup unsalted butter, softened
-
¾ cup granulated sugar
-
¾ cup brown sugar, packed
-
2 large eggs
-
2 teaspoons vanilla extract
-
Gel food coloring (pastel pink, purple, yellow, and blue)
-
2 cups chocolate chips, plus extra for topping
Instructions
-
Step 1
Preheat oven to 375°F (190°C). Line baking sheets with parchment paper. -
Step 2
In a medium bowl, whisk together the flour, baking soda, and salt. Set aside. -
Step 3
In a large bowl, cream together the softened butter, granulated sugar, and brown sugar until light and fluffy. -
Step 4
Beat in the eggs one at a time, then stir in the vanilla extract. -
Step 5
Gradually add the dry ingredients to the wet ingredients, mixing until just combined. Stir in the chocolate chips. -
Step 6
Divide the cookie dough into four equal portions. Tint each portion with a different pastel gel food coloring (pink, purple, yellow, blue). Gently swirl the colors together within each portion for a marbled effect, being careful not to overmix. -
Step 7
Drop rounded tablespoons of the colored dough onto the prepared baking sheets, leaving about 2 inches between cookies. Press a few extra chocolate chips onto the tops of the cookies. -
Step 8
Bake for 9 to 11 minutes, or until the edges are golden brown and the centers are still slightly soft. Allow cookies to cool on the baking sheets for a few minutes before transferring to wire racks to cool completely.
Important Information
Nutrition Facts (Per Serving)
It is important to consider this information as approximate and not to use it as definitive health advice.
Allergy Information
Please check ingredients for potential allergens and consult a health professional if in doubt.