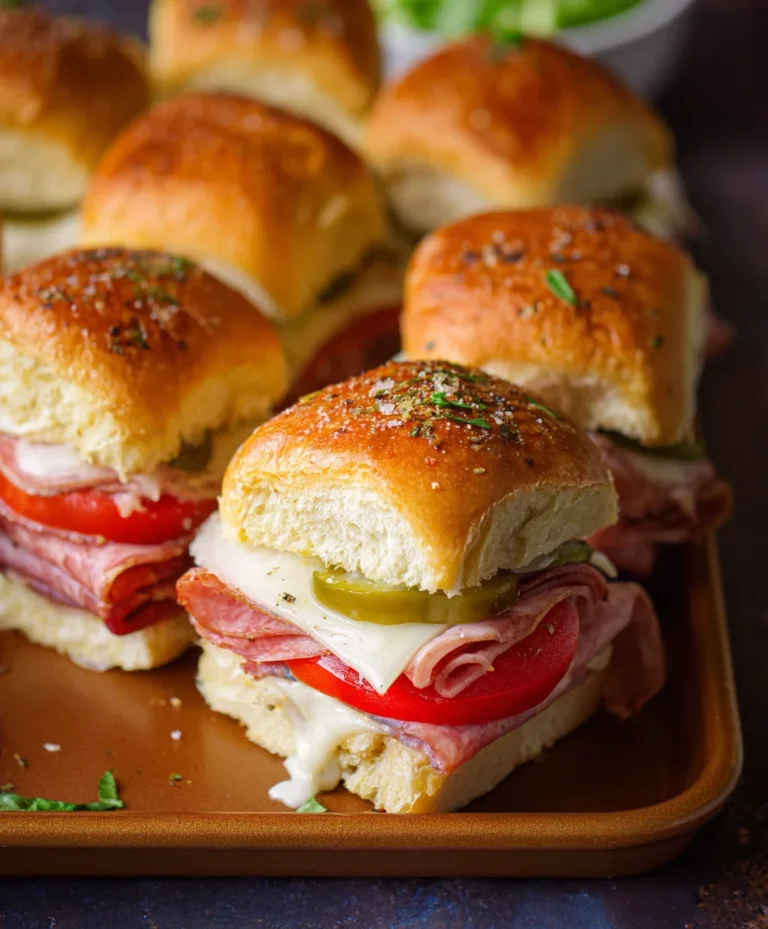
Easy Crack Chicken Sliders – Hawaiian Roll Recipe
Crack Chicken Sliders on Hawaiian Rolls are more than just a delicious appetizer; they’re a guaranteed crowd-pleaser, a culinary hug in slider form. Have you ever experienced that irresistible urge for something savory, cheesy, and just a little bit sweet? That’s the magic of these sliders. People absolutely adore them because they manage to be both incredibly satisfying and surprisingly easy to make. The combination of tender, shredded chicken, a creamy, tangy filling, and the soft, slightly sweet embrace of Hawaiian rolls creates a flavor profile that’s truly addictive. What makes Crack Chicken Sliders on Hawaiian Rolls so special is the perfect balance of textures and tastes. The savory chicken gets a boost from cream cheese and ranch seasoning, while a touch of cheddar adds melty goodness. Then, you have those iconic Hawaiian rolls, their sweetness cutting through the richness and making every bite an absolute delight. They are perfect for game days, parties, or even a weeknight treat when you need a little something extra special without all the fuss.

Ingredients:
- 16 ounces (2 8-ounce) packages cream cheese, softened
- 1 ounce packet dry ranch dressing mix
- 2 teaspoons onion powder
- 1 teaspoon fresh cracked black pepper
- ⅓ cup thinly sliced green onion
- 2½ cups cooked, shredded boneless, skinless chicken breast
- 12 ounce package cooked, crum extractbled beef beef bacon
- 2½ cups mild shredded cheddar cheese (divided into 1 cup and 1 ½ cups)
- 12 count package sweet Hawaiian Rolls, sliced in half horizontally
- 6 tablespoons salted sweet cream butter, melted
- 2 tablespoons grated Parmesan cheese
- 2 teaspoons finely chopped fresh chives
Preparing the Delicious Crack Chicken Filling
This is where all the magic happens! We’re going to create a rich, savory, and incredibly satisfying filling that will elevate your Hawaiian rolls to a whole new level of deliciousness. The key to this step is ensuring everything is well combined and that the cream cheese has softened properly, which makes it much easier to mix and creates a smoother consistency. I like to take my cream cheese out of the refrigerator at least an hour before I plan to start mixing, especially if my kitchen is on the cooler side.
-
Step 1: Combine the Creamy Base
In a large mixing bowl, add the softened cream cheese. To this, I like to add the entire packet of dry ranch dressing mix. This mix is the secret weapon for that distinctive ranch flavor that pairs so perfectly with chicken and cheese. Next, sprinkle in the onion powder and the fresh cracked black pepper. If you don’t have fresh cracked black pepper, regular ground black pepper will work in a pinch, but the fresh stuff really does add an extra layer of aroma and taste. Now, using a sturdy spoon or a spatula, mix these ingredients together until they are thoroughly combined. You want a smooth, homogenous mixture with no visible streaks of cream cheese or dry seasoning. This forms the rich, creamy foundation for our filling.
-
Step 2: Incorporate the Savory Elements
Once your creamy base is ready, it’s time to add the heart of the “crack chicken” flavor. Add the cooked, shredded chicken breast to the bowl. Make sure your chicken is evenly shredded; larger chunks can make it harder to distribute the filling evenly later. Next, arum extractthe crumbled cooked beef baconbbeef bacon The bacon adds a wonderful smoky and salty crunch that complements the creaminess of the chicken and cheese. If you’re using storebeef baconht cooked bacon bits, ensure they are good quality. Now, add 1 cup of the mild shredded cheddar cheese. We’re saving the rest for later to create a gooey, cheesy topping. Gently fold all these ingredients into the cream cheese mixture. The goal here is to coat everything evenly in the creamy ranch mixture. Don’t overmix at this stage; just ensure everything is well distributed.
-
Step 3: Add Freshness and Final Touches to the Filling
Now, let’s add some freshness and a pop of color to our filling. Stir in the thinly sliced green onion. The green onion provides a mild, fresh oniony bite that cuts through the richness of the cheese and chicken. If you’re not a fan of raw onion, you can omit this, but I find it really elevates the flavor. After the green onions, we’ll fold in the finely chopped fresh chives. Chives offer a delicate oniony flavor that’s a bit milder than green onions and adds a beautiful green fleck throughout the mixture. Give everything a final gentle stir to distribute the green elements evenly. You should now have a beautifully combined, flavorful, and chunky filling ready for assembly.
Assembling and Baking the Crack Chicken Sliders
This is the fun part where we transform our delicious filling and sweet rolls into irresistible sliders. The sweet Hawaiian rolls are the perfect vehicle for this savory filling, and the melted butter and Parmesan topping will create a golden, crispy crust that is simply divine.
-
Step 4: Assemble the Sliders
Take your sliced sweet Hawaiian rolls and arrange the bottom halves in a 9×13 inch baking dish. This ensures they are all nestled together, ready to be piled high with our filling. Now, evenly distribute the crack chicken filling over the bottom halves of the rolls. Try to get a good amount on each roll, ensuring a nice, generous portion. Don’t worry if it’s not perfectly neat; rustic charm is part of the appeal! Once the filling is distributed, sprinkle the remaining 1 ½ cups of mild shredded cheddar cheese evenly over the top of the filling. This will create that irresistible melted cheese layer.
-
Step 5: Prepare and Apply the Golden Topping
In a small bowl, whisk together the melted salted sweet cream butter and the grated Parmesan cheese. This mixture is going to create a beautifully golden and slightly crispy topping for our sliders. Using a pastry brush or a spoon, drizzle or brush this butter and Parmesan mixture evenly over the top halves of the Hawaiian rolls. Make sure to coat them well, as this is where a lot of the flavor and texture comes from. Gently place the buttered top halves of the rolls back onto the filling, creating your sliders. At this point, you can cover the baking dish tightly with aluminum foil. This helps to steam the rolls slightly and melt the cheese without the tops getting too brown too quickly.
-
Step 6: Bake to Perfection
Preheat your oven to 350°F (175°C). Place the foil-covered baking dish into the preheated oven. Bake for 20 minutes. After 20 minutes, carefully remove the aluminum foil. Continue to bake for another 10-15 minutes, or until the cheese is melted and bubbly, and the tops of the Hawaiian rolls are golden brown and slightly toasted. Keep an eye on them during this last stage to prevent burning. The aroma that will fill your kitchen at this point is absolutely incredible! Once they are perfectly golden and gooey, remove them from the oven. Let them rest in the baking dish for a few minutes before serving. This allows the filling to set up slightly, making them easier to handle and serve.

Conclusion:
There you have it! Crafting these delicious Crack Chicken Sliders on Hawaiian Rolls is a rewarding experience, yielding a dish that’s both incredibly satisfying and surprisingly easy to pull off. The combination of savory shredded chicken, creamy cheese, and the sweet embrace of Hawaiian rolls creates a flavor explosion that’s simply irresistible. Whether you’re hosting a game day party, a casual weeknight dinner, or just craving a comforting meal, these sliders are sure to be a crowd-pleaser. Don’t be afraid to experiment with serving them alongside a crisp coleslaw, some crispy sweet potato fries, or a light green salad for a complete and balanced meal.
We’ve explored some fantastic variations, from adding a kick with jalapeños to a smoky depth with beef bacon. The beauty of these Crack Chicken Sliders on Hawaiian Rolls lies in their versatility. So, go forth, get creative in your kitchen, and most importantly, enjoy every single bite of these delightful sliders!
Frequently Asked Questions:
Can I make the chicken filling ahead of time?
Absolutely! The shredded chicken filling for your Crack Chicken Sliders on Hawaiian Rolls can be made up to 2-3 days in advance and stored in an airtight container in the refrigerator. This is a great way to save time on busy days. Just reheat gently before assembling your sliders.
What are some other great topping ideas besides the standard ones?
Beyond the classic toppings, consider adding a drizzle of sriracha mayo for a spicy kick, some crispy fried onions for extra crunch, or even a sprinkle of fresh chives or parsley for a pop of color and freshness to your Crack Chicken Sliders on Hawaiian Rolls.
Easy Crack Chicken Sliders – Hawaiian Roll Recipe
Delicious and easy to make crack chicken sliders on sweet Hawaiian rolls, perfect for any gathering.
Ingredients
-
16 ounces (2 8-ounce) packages cream cheese, softened
-
1 ounce packet dry ranch dressing mix
-
2 teaspoons onion powder
-
1 teaspoon fresh cracked black pepper
-
⅓ cup thinly sliced green onion
-
2½ cups cooked, shredded boneless, skinless chicken breast
-
12 ounce package cooked, crumbled beef bacon
-
2½ cups mild shredded cheddar cheese, divided
-
12 count package sweet Hawaiian Rolls, sliced in half horizontally
-
6 tablespoons salted sweet cream butter, melted
-
2 tablespoons grated Parmesan cheese
-
2 teaspoons finely chopped fresh chives
Instructions
-
Step 1
In a large mixing bowl, combine softened cream cheese, dry ranch dressing mix, onion powder, and fresh cracked black pepper until smooth. -
Step 2
Add cooked shredded chicken breast, crumbled beef bacon, and 1 cup of shredded cheddar cheese to the cream cheese mixture. Gently fold until evenly coated. -
Step 3
Stir in the thinly sliced green onion and finely chopped fresh chives into the chicken filling. -
Step 4
Arrange the bottom halves of the Hawaiian rolls in a 9×13 inch baking dish. Evenly distribute the crack chicken filling over the rolls, then sprinkle with the remaining 1 ½ cups of shredded cheddar cheese. -
Step 5
In a small bowl, whisk together the melted butter and grated Parmesan cheese. Brush this mixture evenly over the top halves of the Hawaiian rolls. -
Step 6
Place the buttered top halves of the rolls onto the filling to create sliders. Cover the baking dish tightly with aluminum foil. -
Step 7
Preheat oven to 350°F (175°C). Bake covered for 20 minutes. Remove foil and bake for an additional 10-15 minutes, or until cheese is melted and bubbly, and rolls are golden brown.
Important Information
Nutrition Facts (Per Serving)
It is important to consider this information as approximate and not to use it as definitive health advice.
Allergy Information
Please check ingredients for potential allergens and consult a health professional if in doubt.