Easy Chia Seed Pudding Recipe- Healthy Breakfast Delight
Chia Seed Pudding Recipe is your new best friend for guilt-free indulgence and effortless healthy eating. If you’re looking for a breakfast that’s as nourishing as it is delicious, or a dessert that won’t derail your wellness goals, then you’ve stumbled upon pure magic. This delightful dish has taken the healthy food scene by storm, and for good reason! People adore chia seed pudding for its incredible versatility, its ridiculously simple preparation, and the satisfying, tapioca-like texture that’s surprisingly creamy and luscious. What truly sets this chia seed pudding recipe apart is its ability to transform humble chia seeds into a sophisticated treat with just a few pantry staples. It’s a blank canvas for your favorite fruits, nuts, and sweeteners, making every spoonful a personalized masterpiece.
Why You’ll Love This Chia Seed Pudding Recipe
Effortless Preparation, Remarkable Results
Chia Seed Pudding Recipe
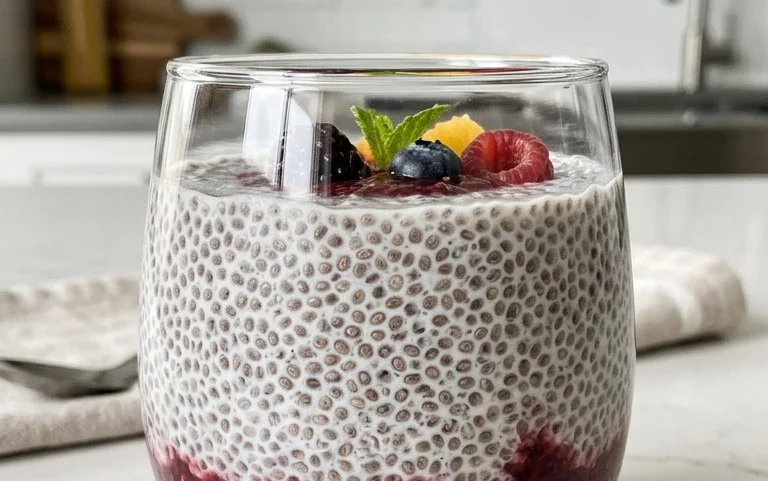
Chia seed pudding is one of those magical dishes that requires minimal effort but delivers maximum deliciousness and health benefits. It’s the perfect make-ahead breakfast, a satisfying snack, or even a light dessert. The beauty of chia pudding lies in its simplicity and versatility. These tiny seeds, when combined with liquid, transform into a gelatinous, tapioca-like texture that is incredibly satisfying. Plus, they’re packed with fiber, omega-3 fatty acids, and antioxidants, making them a true superfood.
This recipe is a fantastic starting point, and I’ll offer some ideas for customization later. For now, let’s dive into the core of how to create this delightful treat. The magic happens when you combine the chia seeds with your liquid of choice and let them work their wonders. It’s less about active cooking and more about patient waiting, allowing the seeds to absorb the liquid and thicken.
Ingredients:
Instructions:
Let’s get started on making your delicious chia seed pudding. The process is straightforward and takes only a few minutes of active prep.
1. Combine the dry ingredients: Grab a medium-sized bowl or a jar with a lid. Add the 3 tablespoons of chia seeds to it. If you’re using any additional dry mix-ins like a pinch of cinnamon or a dash of cocoa powder for a chocolate version, now is the time to add them and give them a quick stir with the chia seeds. This ensures they’re evenly distributed from the start.
2. Add the wet ingredients and whisk: Pour the 3/4 cup of your chosen milk over the chia seeds. I often use almond milk or oat milk for a creamy texture, but any milk you prefer – dairy or non-dairy – will work beautifully. Next, drizzle in the 1 tablespoon of maple syrup. If you’re using a different sweetener like agave nectar, honey, or even a sugar-free option, feel free to adjust the amount to your sweetness preference. Finally, add the 1 teaspoon of vanilla extract. This adds a lovely warmth and depth of flavor. Now, grab a whisk or a fork and vigorously stir everything together. You want to ensure there are no clumps of chia seeds sticking together at the bottom or sides of the bowl. This initial whisking is crucial for preventing the seeds from clumping as they begin extract to absorb the liquid.
3. Allow to hydrate and whisk again: Cover the bowl or jar and let it sit for about 5-10 minutes. During this time, the chia seeds will start to absorb the liquid. After this initial resting period, uncover the mixture and give it another thorough whisk. You’ll notice it’s already starting to thicken slightly, and you might see some seeds begin extractning to clump. Whisking again breaks up any nascent clumps and ensures a smoother, more uniform pudding consistency. This second whisk is arguably the most important step in achieving a lump-free pudding.
4. Chill to thicken: Once you’ve given it a good whisk, cover the bowl or jar again. Place it in the refrigerator for at least 2-4 hours, or ideally, overnight. The longer it chills, the thicker and more pudding-like the mixture will become. The chia seeds will continue to absorb the liquid and swell, creating that characteristic gel. I often make a batch the night before so it’s ready to go for breakfast. If you’re in a rush and can’t wait for it to thicken fully, you can try a shorter chilling time of about an hour, but the texture might be a bit more liquidy.
5. Serve and enjoy: After chilling, give your chia seed pudding one final stir. If it has become too thick for your liking, you can stir in a splash more milk to reach your desired consistency. Spoon the pudding into serving bowls or glasses. This is where the fun really begin extracts with toppings!
Serving Suggestions and Variations
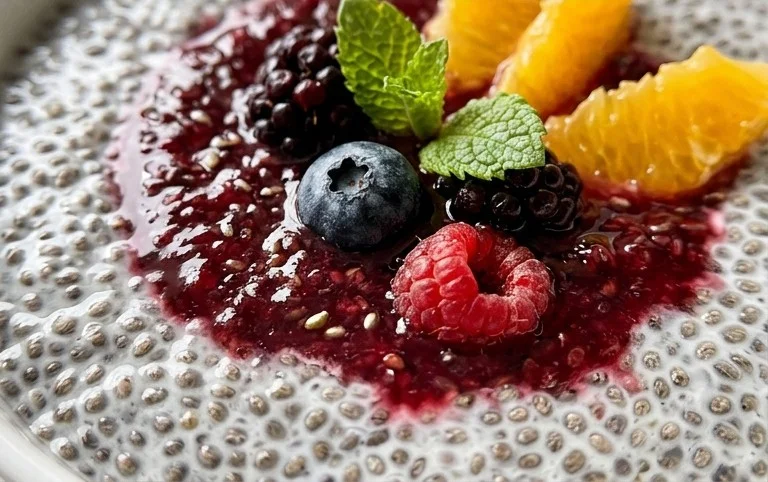
Now that you have your basic chia seed pudding, let’s talk about how to make it even more exciting. The toppings are where you can truly personalize your chia pudding.
This recipe is a testament to how simple ingredients can create something so nourishing and delicious. It’s a flexible base that can be adapted to any taste preference or dietary need. Experiment with different milks, sweeteners, and an endless array of toppings to discover your perfect chia seed pudding combination. Enjoy!
Conclusion:
And there you have it – a delightful and remarkably simple Chia Seed Pudding recipe that’s poised to become a staple in your kitchen! This recipe truly shines due to its incredible versatility and nutritional powerhouse status. Chia seeds themselves are brimming with fiber, omega-3 fatty acids, and protein, making this pudding not just delicious but also incredibly good for you. It’s the perfect breakfast, a satisfying snack, or even a light dessert that requires minimal effort but yields maximum flavor and goodness. Don’t be afraid to get creative with your toppings!
I love serving my chia seed pudding with fresh berries for a burst of sweetness and antioxidants, a sprinkle of granola for added crunch, or a drizzle of honey or maple syrup for extra indulgence. Feel free to experiment with different plant-based milks like almond, coconut, or soy milk to discover your favorite flavor profile. You can also incorporate flavorings like vanilla extract, cocoa powder for a chocolatey twist, or even a pinch of cinnamon for warmth.
I truly encourage you to give this easy Chia Seed Pudding recipe a try. It’s a fantastic way to incorporate more nutrient-dense foods into your diet without sacrificing taste or convenience. Embrace the simplicity and enjoy the delicious results!
Frequently Asked Questions:
How long does chia seed pudding take to set?
Typically, chia seed pudding needs at least 2-4 hours in the refrigerator to thicken and set properly. For the best texture, I recommend preparing it the night before and letting it chill overnight.
Can I make chia seed pudding without milk?
While milk is essential for achieving the creamy pudding consistency, you can certainly use water. However, the texture will be less rich and creamy. For the best flavor and texture, I highly recommend using your favorite plant-based or dairy milk.
What are some other topping ideas?
Beyond berries and granola, consider sliced banana, chopped nuts (like almonds or walnuts), shredded coconut, a dollop of yogurt (dairy or non-dairy), or even a swirl of nut butter like peanut or almond butter. Fresh fruit combinations are always a winner!
Chia Seed Pudding Recipe
A simple and healthy chia seed pudding recipe that can be customized with your favorite flavors.
Ingredients
-
3 tablespoons chia seeds
-
1 tablespoon maple syrup
-
1 teaspoon vanilla
-
3/4 cup milk of choice
-
1/4 cup berries (for topping)
-
1 tablespoon nuts (for topping)
Instructions
-
Step 1
In a bowl or jar, combine the chia seeds, maple syrup, and vanilla extract. -
Step 2
Pour in the milk of your choice and whisk or stir well to combine, ensuring no clumps of chia seeds. -
Step 3
Let the mixture sit for about 5 minutes, then whisk again to break up any lumps that may have formed. -
Step 4
Cover the bowl or jar and refrigerate for at least 2 hours, or preferably overnight, until thickened. -
Step 5
Stir the pudding once more before serving. -
Step 6
Top with fresh berries and nuts, or your preferred toppings.
Important Information
Nutrition Facts (Per Serving)
It is important to consider this information as approximate and not to use it as definitive health advice.
Allergy Information
Please check ingredients for potential allergens and consult a health professional if in doubt.