Easy St Patrick’s Day Cookies-Simple & Delicious Recipes
Easy St. Patrick’s Day Cookies are the perfect way to add a little festive cheer to your celebration without spending hours in the kitchen. As the luck of the Irish approaches, who doesn’t want a delightful treat to mark the occasion? These aren’t just any cookies; they are little bites of joy that bring smiles to faces young and old. What makes these Easy St. Patrick’s Day Cookies so special is their simplicity and their ability to be completely customized with fun green and gold decorations. They’re incredibly forgiving, meaning even if you’re a begin extractner baker, you can whip up a batch that looks as good as it tastes. Plus, they’re perfect for sharing with friends, family, or even leaving out for a leprechaun!
Get Ready for Some Sweet Luck!
Let’s make some magic happen.
Easy St. Patrick’s Day Cookies
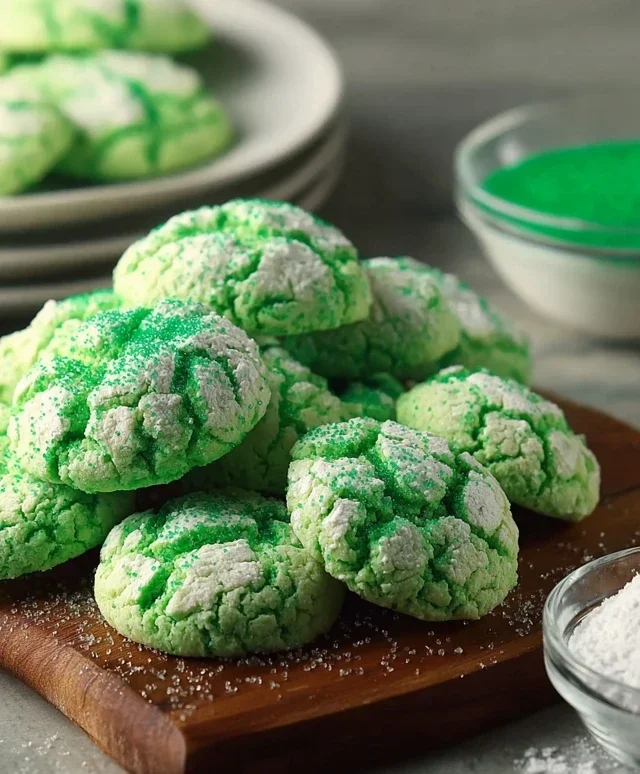
Looking for a fun and festive way to celebrate St. Patrick’s Day without spending hours in the kitchen? These Easy St. Patrick’s Day Cookies are your answer! They are incredibly simple to make, using a base of white cake mix, which means they’re foolproof and yield perfectly soft, slightly chewy cookies every time. The vibrant green color makes them instantly festive, and the simple glaze adds just the right touch of sweetness. These are perfect for a quick treat, a class party, or just to bring some cheer to your day. You won’t believe how easy it is to whip up a batch of these delightful green delights!
Ingredients:
Making the Dough
Let’s get started! The beauty of these cookies lies in their simplicity. You won’t need any fancy equipment or hard-to-find ingredients. Grab a large mixing bowl and let’s combine everything for our cookie dough.
First, pour the entire box of white cake mix into your mixing bowl. This is the magic ingredient that makes these cookies so easy and delicious. The cake mix provides the structure and a lovely, tender crum extractb. Next, crack in your two large eggs. Eggs are essential for binding the ingredients together and adding richness and moisture to the cookies. Then, measure out 1/3 cup of vegetable oil. Vegetable oil contributes to the soft and chewy texture of the cookies, preventing them from becoming dry or crum extractbly.
Now for the fun part – the color! Add the 1/4 teaspoon of Kelly green gel food coloring to the bowl. Gel food coloring is fantastic because it’s highly concentrated, meaning you get a vibrant color without adding too much liquid to your dough, which could affect the texture. Start with 1/4 teaspoon, and if you want an even more intense green, you can add a tiny bit more, a drop at a time, until you achieve your desired shade of St. Patrick’s Day green.
Using a sturdy spoon or a hand mixer on low speed, begin extract to mix the ingredients together. You’ll notice the mixture will start to come together into a soft, slightly sticky dough. It’s important not to overmix at this stage. Just mix until everything is well combined and there are no dry pockets of cake mix visible. The dough will be quite soft, and that’s perfectly normal.
Forming and Baking the Cookies
Once your dough is mixed, it’s time to shape these festive cookies. This dough is a bit sticky, so I find it easiest to use a small cookie scoop or two spoons to drop rounded portions of dough onto your prepared baking sheets. If you prefer, you can lightly flour your hands to prevent sticking, but I find it’s often easier to just use a scoop.
Preheat your oven to 350 degrees Fahrenheit (175 degrees Celsius). Line your baking sheets with parchment paper or silicone baking mats. This is a crucial step for easy cleanup and to prevent the cookies from sticking to the pan. Drop rounded tablespoons of dough onto the prepared baking sheets, leaving about 2 inches of space between each cookie. They will spread slightly as they bake.
Now, place the baking sheets in your preheated oven. Bake for 8 to 10 minutes, or until the edges are lightly golden and the centers look set. Be careful not to overbake them, as this will result in harder cookies. We want them to be soft and chewy! Once baked, remove the cookies from the oven and let them cool on the baking sheets for a few minutes before transferring them to a wire rack to cool completely. This is important because they will be very delicate when they first come out of the oven. Allowing them to cool slightly on the sheet helps them firm up.
The Simple Green Glaze
While your cookies are cooling, it’s time to whip up a simple, sweet glaze that will add an extra touch of deliciousness and festivity. In a small bowl, combine the 3 tablespoons of granulated sugar and the 6 tablespoons of powdered sugar. This combination provides a nice sweetness and helps the glaze set up nicely.
Gradually add a small amount of milk or water (about 1 to 2 tablespoons to start) to the sugar mixture, whisking constantly until you achieve a smooth, drizzly consistency. You want the glaze to be thick enough to coat the cookies but thin enough to drizzle. If it’s too thick, add a tiny bit more liquid, a teaspoon at a time. If it’s too thin, add a little more powdered sugar. You can also add another tiny drop of green food coloring here if you want to make the glaze a brighter green to contrast with the cookie, or if you want to deepen the color of the cookies themselves.
Once the cookies are completely cool, you can get creative with the glazing. You can dip the tops of the cookies into the glaze, or use a spoon to drizzle the glaze over the tops of the cookies. For a more decorative look, you can use a piping bag with a small tip to create patterns or swirls. If you want to add even more St. Patrick’s Day flair, sprinkle some green or gold edible glitter or sprinkles onto the glaze before it sets. These are totally optional but add a lot of sparkle and fun!
Let the glazed cookies sit on the wire rack until the glaze has set. This usually takes about 15-20 minutes. Once the glaze is set, your Easy St. Patrick’s Day Cookies are ready to be enjoyed! They store well in an airtight container at room temperature for several days. Enjoy your festive, homemade treats!

Conclusion:
There you have it! My simple and utterly delightful recipe for Easy St. Patrick’s Day Cookies is perfect for adding a touch of festive cheer to your celebrations without any fuss. These cookies are fantastic because they’re incredibly forgiving, allowing even novice bakers to achieve sweet, satisfying results. Their tender texture and buttery flavor make them a crowd-pleaser, and the simple decorating options mean you can easily personalize them for any occasion, not just St. Patrick’s Day.
Serving these green delights is a breeze. They’re wonderful on their own with a glass of milk, or you can elevate them by pairing them with a cup of coffee or tea. Consider arrangin extractg them on a platter for a potluck or as a sweet treat after a hearty Irish meal. For variations, don’t be afraid to get creative! Add a pinch of mint extract to the dough for a refreshing twist, or use different colored sprinkles to match any holiday. You could even make a simple glaze with a hint of lime for an extra zing. I truly hope you’ll give this easy St. Patrick’s Day Cookies recipe a try – you might just find your new go-to cookie!
Frequently Asked Questions:
Can I make these cookies ahead of time?
Absolutely! These cookies store very well. Once completely cooled, you can keep them in an airtight container at room temperature for up to 3-4 days. This makes them perfect for preparing in advance for your St. Patrick’s Day festivities.
What’s the best way to get a vibrant green color?
For a truly festive green, I recommend using gel food coloring. It’s more concentrated than liquid food coloring, so you’ll need less to achieve a rich, deep hue without affecting the dough’s consistency. Start with a small amount and add more until you reach your desired shade.
Easy St. Patrick’s Day Cookies
Simple and festive green cookies perfect for St. Patrick’s Day celebrations. These cookies use a cake mix base for ultimate ease.
Ingredients
-
1 box (15.25 oz) white cake mix (about 3 cups)
-
2 large eggs
-
1/3 cup vegetable oil
-
1/4 teaspoon Kelly green gel food coloring
-
3 tablespoons granulated sugar
-
6 tablespoons powdered sugar
Instructions
-
Step 1
Preheat oven to 350°F (175°C). Line baking sheets with parchment paper. -
Step 2
In a large bowl, combine the white cake mix, eggs, and vegetable oil. Mix until just combined. -
Step 3
Add the Kelly green gel food coloring and mix until the dough is evenly colored. -
Step 4
Roll the dough into small balls, about 1 inch in diameter. Roll each ball in granulated sugar. -
Step 5
Place the sugared dough balls about 2 inches apart on the prepared baking sheets. -
Step 6
Bake for 8-10 minutes, or until the edges are lightly golden. Do not overbake. -
Step 7
Let the cookies cool on the baking sheets for a few minutes before transferring them to a wire rack to cool completely. Once cooled, dust with powdered sugar for a frosty effect.
Important Information
Nutrition Facts (Per Serving)
It is important to consider this information as approximate and not to use it as definitive health advice.
Allergy Information
Please check ingredients for potential allergens and consult a health professional if in doubt.