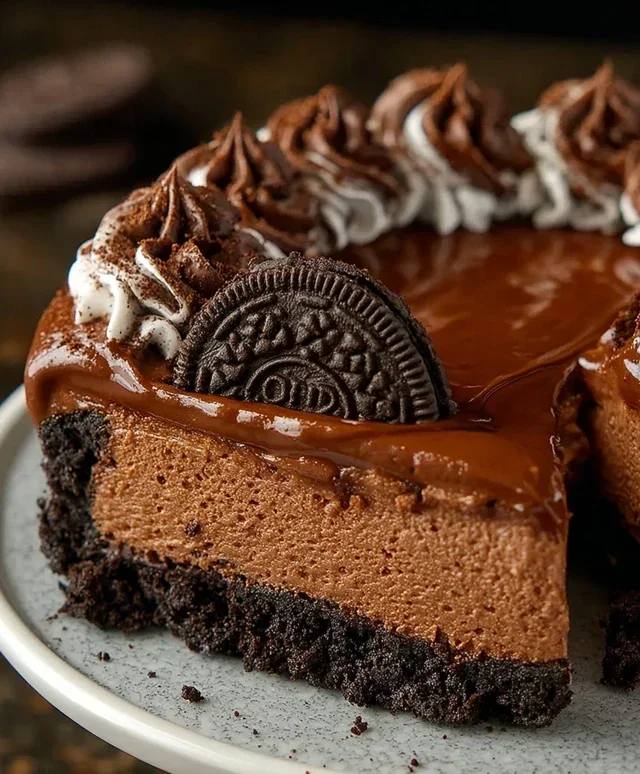
No Bake Oreo Nutella Cheesecake – Easy Dessert
No Bake Oreo Nutella Cheesecake is more than just a dessert; it’s a symphony of textures and flavors that will have you swooning. Imagin extracte a creamy, dreamy filling, kissed with the irresistible magic of Nutella, all nestled within a crum extractbly, chocolatey Oreo crust. What’s not to love about this no-bake wonder? It’s the ultimate crowd-pleaser, perfect for those moments when you crave something utterly decadent without the fuss of turning on the oven. We adore this particular No Bake Oreo Nutella Cheesecake because it strikes that perfect balance between intensely chocolatey and wonderfully creamy, with the satisfying crunch of Oreos providing a delightful counterpoint. It’s incredibly easy to whip up, making it your new go-to for potlucks, last-minute gatherings, or even just a treat for yourself after a long day.
Why this No Bake Oreo Nutella Cheesecake is a must-try:
It’s unbelievably simple.
The flavor combination is pure bliss.
It’s guaranteed to impress.
No Bake Oreo Nutella Cheesecake
Get ready to impress yourself and everyone around you with this utterly decadent No Bake Oreo Nutella Cheesecake. This dessert is a dream for chocolate and hazelnut lovers, combining the iconic crunch of Oreos with the irresistible allure of Nutella in a gloriously creamy, no-bake cheesecake. It’s surprisingly easy to make, requiring no oven time, which makes it perfect for those hot summer days or when you just want a fuss-free, show-stopping dessert. The rich, chocolatey crust provides the perfect foundation for the smooth, creamy filling, all topped off with a swirl of luscious Nutella and a sprinkle of extra Oreo goodness. Let’s dive into making this masterpiece!
Ingredients:
Crust Preparation: The Foundation of Deliciousness
The first step to our glorious cheesecake is creating the perfect base. This isn’t just any crust; it’s a delightful Oreo-infused foundation that sets the stage for the creamy filling to come. Take your 200g of crushed Oreos and combine them in a medium bowl with the 50g of melted butter. It’s important to ensure the butter is fully incorporated into the crushed cookies. You want the mixture to resemble wet sand – when you squeeze a bit in your hand, it should hold its shape. If it feels too dry, you can add a tiny bit more melted butter, but be careful not to make it greasy.
Next, press this mixture firmly into the bottom of a 20-23cm (8-9 inch) springform pan. I like to use the bottom of a glass or a flat-bottomed measuring cup to get an even and compact layer. A well-compacted crust is essential for a cheesecake that holds its shape beautifully when sliced. You want it to be firm enough to support the creamy filling. Once you’ve pressed it down evenly, pop the pan into the refrigerator to set while we prepare the filling. This chilling time is crucial for ensuring the crust firms up properly.
The Creamy, Dreamy Filling: A Symphony of Flavors
Now for the star of the show – the no-bake cheesecake filling! In a large mixing bowl, combine the 500g of softened cream cheese with the 200g of Nutella. It’s vital that the cream cheese is properly softened; this means taking it out of the refrigerator at least 30-60 minutes before you plan to start. Softened cream cheese will blend much more smoothly and prevent any lumps in your cheesecake filling. Use an electric mixer (handheld or stand mixer) on medium speed to beat the cream cheese and Nutella together until they are completely smooth and well combined. Scrape down the sides of the bowl occasionally to ensure everything is incorporated.
In a separate, clean bowl, whip the 200g of heavy whipping cream with the 50g of sugar. Whip this on medium-high speed until stiff peaks form. Stiff peaks mean that when you lift the whisk or beaters, the cream will stand straight up and hold its shape without drooping. This whipped cream will add incredible lightness and airiness to our cheesecake filling. Be careful not to over-whip, or you’ll end up with butter! Once the cream is whipped to perfection, gently fold it into the cream cheese and Nutella mixture. Folding is a technique where you use a spatula to gently incorporate the whipped cream without deflating it. You want to maintain that fluffy texture. Fold until just combined and no streaks of cream cheese or whipped cream remain.
Assembling Your Masterpiece: Layers of Joy
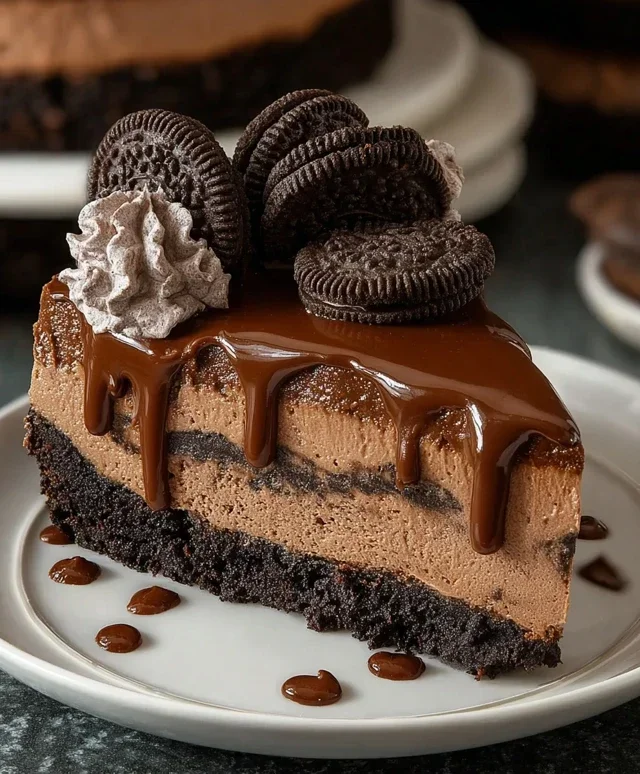
Once the filling is beautifully combined, it’s time to assemble the cheesecake. Take your chilled crust out of the refrigerator. Gently spoon the creamy filling over the Oreo crust, spreading it evenly with your spatula. Make sure to get right to the edges. For an extra burst of texture and flavor, gently fold in the 100g of chopped Oreos into the filling mixture before spreading it into the pan, or sprinkle them evenly over the filling once it’s spread. I personally love to mix them in so you get little pockets of Oreo crunch throughout.
Now, for the mesmerizing Nutella drizzle! Take the 100g of Nutella and gently warm it in the microwave for about 15-30 seconds, or until it’s pourable but not hot. Drizzle this warmed Nutella artfully over the top of the cheesecake filling. You can use a spoon to create swirls or zig-zags. This not only adds another layer of delicious Nutella flavor but also makes the cheesecake look incredibly professional and appealing.
The Final Flourishes: Garnishing Perfection
To complete the visual and textural appeal of your no-bake wonder, we add the final touches. Sprinkle the 5 crushed Oreos (just the cookie part, no filling needed for this sprinkle) over the Nutella drizzle. This adds a subtle extra crunch and reinforces the Oreo theme. Finally, arrange the 6 whole Oreos around the edge of the cheesecake for a truly stunning presentation. These are your crowning jewels!
Chill and Enjoy: The Sweet Reward
The hardest part is over – now comes the waiting game! Cover the springform pan loosely with plastic wrap, making sure not to touch the surface of the cheesecake. Place the cheesecake in the refrigerator and let it chill for at least 6 hours, but ideally overnight. This chilling time is essential for the cheesecake to set properly and for the flavors to meld beautifully. The longer it chills, the firmer and more delicious it will be.
Once your no-bake Oreo Nutella cheesecake is fully set, carefully release the sides of the springform pan. Slice with a sharp knife (dipping the knife in hot water and drying it between slices can help create clean cuts) and serve. Prepare for applause, because this dessert is guaranteed to be a crowd-pleaser! Enjoy every rich, creamy, chocolatey bite.
Conclusion:
And there you have it – your guide to creating a truly decadent No Bake Oreo Nutella Cheesecake! This recipe is an absolute winner because it delivers incredible flavor and a luxuriously creamy texture with minimal effort. The combination of crunchy Oreo crust, rich Nutella swirled into smooth cream cheese filling, and those irresistible whole Oreos on top is simply divine. It’s the perfect dessert for when you crave something special but don’t want to turn on the oven, making it ideal for hot summer days or busy weeknights.
Serving this masterpiece is as easy as it gets. Slice it up and enjoy it as is for a pure, unadulterated treat. For a little extra flair, consider topping each slice with a dollop of whipped cream, a sprinkle of extra crushed Oreos, or even a drizzle of more Nutella. The possibilities for variations are also exciting! You could add a layer of chopped hazelnuts for an extra nutty crunch, swap out the Oreos for other chocolate cookies, or even infuse the cream cheese mixture with a hint of coffee for a mocha twist. I genuinely encourage you to give this No Bake Oreo Nutella Cheesecake a try – it’s a guaranteed crowd-pleaser and surprisingly simple to whip up!
Frequently Asked Questions:
Can I make this cheesecake ahead of time?
Absolutely! In fact, it’s best to make this No Bake Oreo Nutella Cheesecake at least 4-6 hours, or preferably overnight, before serving. This allows the filling to set properly, ensuring a firm and sliceable cheesecake. It also allows the flavors to meld together beautifully.
What if I don’t have a springform pan?
No worries! While a springform pan is ideal for easy removal, you can also use a regular pie plate or even a square baking dish. If using a pie plate, you’ll need to carefully slice and serve directly from the dish. If using a square dish, you can line it with parchment paper, leaving some overhang on the sides to lift the entire cheesecake out for slicing.
No Bake Oreo Nutella Cheesecake
A decadent no-bake cheesecake combining the classic flavors of Oreo and Nutella, perfect for any occasion.
Ingredients
-
200g crushed Oreos
-
50g melted butter
-
500g cream cheese, softened
-
200g Nutella
-
200g heavy whipping cream (35%)
-
50g sugar
-
100g chopped Oreos
-
100g Nutella
-
100g Nutella, warmed for drizzling
-
5 crushed Oreos (no filling)
-
6 whole Oreos for garnish
Instructions
-
Step 1
Combine crushed Oreos and melted butter in a bowl. Press mixture into the bottom of a 20cm springform pan. -
Step 2
In a separate bowl, beat softened cream cheese until smooth. Gradually beat in 200g Nutella until well combined. -
Step 3
In another bowl, whip heavy cream and sugar until stiff peaks form. Gently fold whipped cream into the cream cheese and Nutella mixture. -
Step 4
Fold in the chopped Oreos and 100g Nutella into the cheesecake mixture. Sprinkle the 5 crushed Oreos (no filling) over the base layer. -
Step 5
Pour the cheesecake mixture over the Oreo base and spread evenly. Chill in the refrigerator for at least 4 hours, or until firm. -
Step 6
Before serving, warm the remaining Nutella for drizzling and drizzle over the cheesecake. Garnish with whole Oreos.
Important Information
Nutrition Facts (Per Serving)
It is important to consider this information as approximate and not to use it as definitive health advice.
Allergy Information
Please check ingredients for potential allergens and consult a health professional if in doubt.