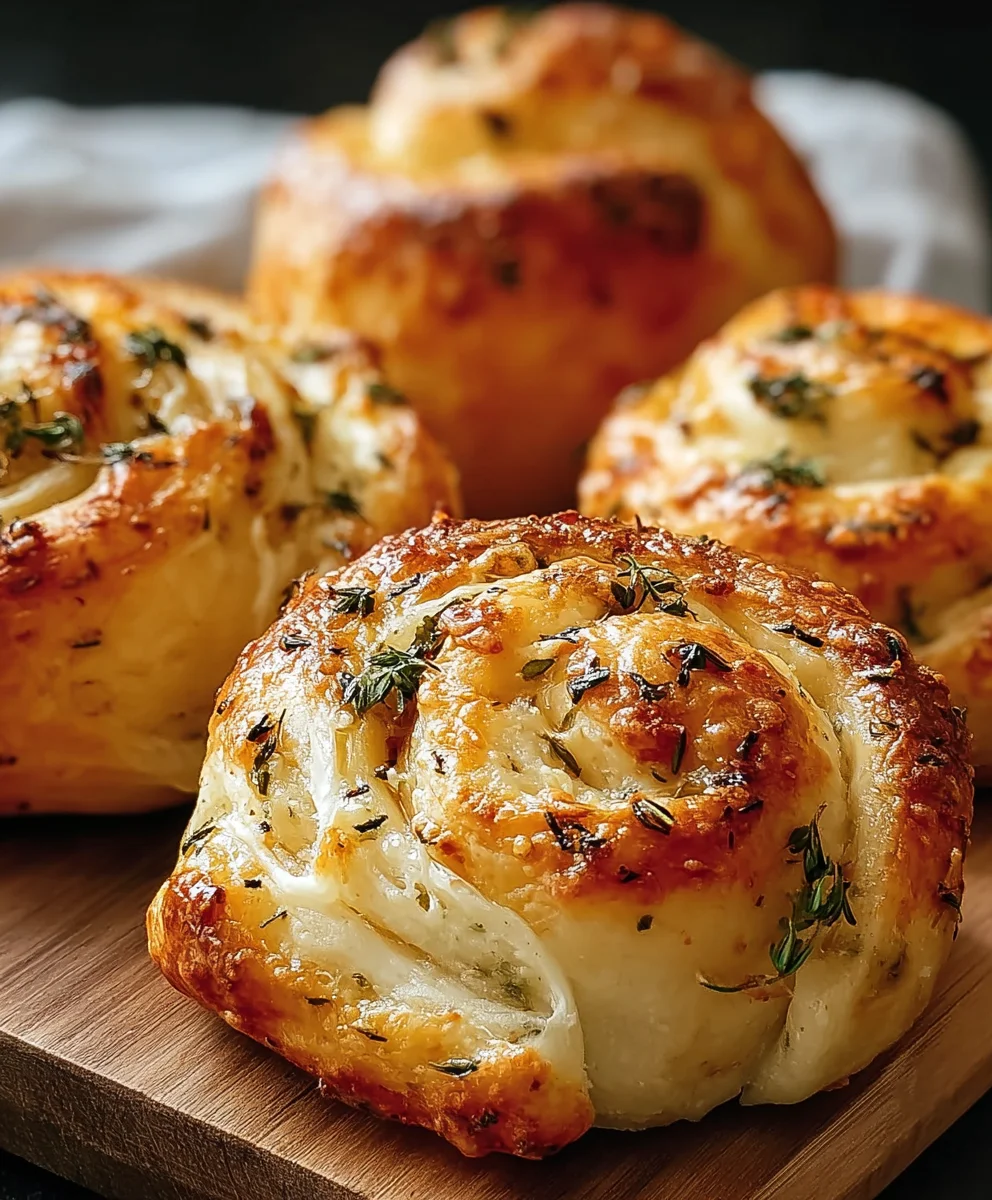
Sourdough Herb Cheese Rolls- Flavorful Easy Recipe
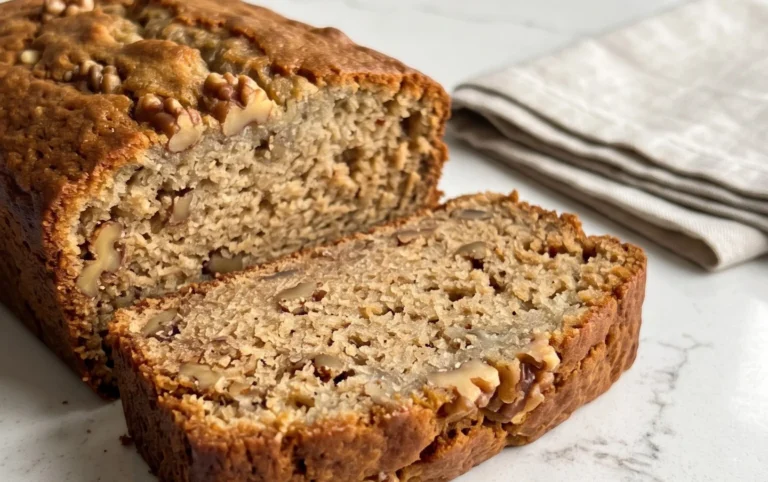
Sourdough Herb and Cheese Rolls are more than just a side dish; they’re an experience. Imagin extracte pulling apart a warm, golden-brown roll, the subtle tang of sourdough beautifully balanced by the savory richness of melted cheese and fragrant herbs. It’s no wonder these delightful creations have captured the hearts (and stomachs!) of so many. The magic lies in the slow fermentation of the sourdough starter, which imparts a unique depth of flavor and a wonderfully chewy texture that simply can’t be replicated with commercial yeast. Each bite is a testament to patient craftsmanship and the simple joy of good ingredients. Whether you’re serving them alongside a hearty stew, as part of a festive brunch, or simply enjoying them on their own with a smear of butter, these Sourdough Herb and Cheese Rolls promise to elevate any meal. Get ready to impress yourself and your loved ones with this truly special recipe.
Ingredients:
- ½ cup (120g) sourdough starter (discard or active)
- ¾ cup (180ml) warm milk
- 2½ cups (315g) all-purpose flour
- 2 tablespoons unsalted butter, melted
- 1 tablespoon sugar
- 1 teaspoon salt
- ½ teaspoon garlic powder (optional)
- 1 cup shredded cheese (cheddar, mozzarella, or parmesan – a blend works wonderfully too!)
- 2 tablespoons unsalted butter, softened
- 1 teaspoon dried oregano
- 1 teaspoon dried basil
- ½ teaspoon black pepper
- 1 egg yolk mixed with 1 tablespoon water (for egg wash)
- Extra shredded cheese for sprinkling
- Additional dried herbs for garnish (like parsley or chives)
Mixing the Dough
Phase 1: Activating the Starter and Initial Mix
The journey to these delicious Sourdough Herb and Cheese Rolls begin extracts with our starter. In a large mixing bowl, combine the warm milk and your sourdough starter. Give it a good stir with a whisk or fork to ensure the starter is evenly distributed throughout the milk. The warmth of the milk will help wake up the yeast in the starter,gin extractcouraging it to work its magic later. Now, add the melted butter, sugar, salt, and the optional garlic powder to this liquid mixture. Whisk everything together until the sugar and salt have mostly dissolved. This forms the flavorful base for our dough.
Next, gradually add the all-purpose flour to the wet ingredients. Start by stirring with a spoon or spatula until agin extractaggy dough begins to form. It will look a bit rough and may have some dry pockets, and that’s perfectly fine at this stage. The gluten development will come with kneading.
Kneading and Developing the Douggin extracth3>
Phase 2: Bringing it all Together
Once you have a shaggy dough, turn it out onto a lightly floured surface. Now comes the fun part: kneading! For about 8-10 minutes, you’ll want to knead the dough until it becomes smooth, elastic, and no longer sticky. Push the dough away from you with the heel of your hand, fold it over, and repeat. If the dough starts to stick to your hands or the surface, lightly dust your hands and the surface with a bit more flour, but be careful not to add too much, as this can make the rolls tough. You’re looking for a dough that springs back slowly when you poke it with your finger.
After kneading, shape the dough into a smooth ball. Lightly grease the mixing bowl you used earlier with a little oil or cooking spray. Place the dough ball back into the bowl, turning it once to coat the surface with the grease. Cover the bowl tightly with plastic wrap or a damp kitchen towel.
First Rise and Flavor Infusion
Phase 3: The Patient Wait
This is where the sourdough really shines! Let the dough rise in a warm place for about 2-4 hours, or until it has doubled in size. The exact time will depend on the warmth of your kitchen and the activity of your sourdough starter. A good indicator is that it should look puffy and have some visible air bubbles on the surface. While the dough is rising, let’s prepare our delicious herb and cheese filling.
In a small bowl, combine the softened butter, dried oregano, dried basil, and black pepper. Mix this together until you have a fragrant herb butter paste. This will be spread over the dough to create those irresistible layers of flavor.
Shaping the Rolls
Phase 4: Rolling and Filling
Once the dough has doubled, gently punch it down to release the air. Turn the dough out onto a lightly floured surface again. Now, roll the dough into a rectangle, roughly 10×12 inches. Aim for an even thickness across the entire surface. Don’t worry if it’s not a perfect rectangle; we’re going for rustic charm!
Evenly spread the herb butter paste over the surface of the rolled-out dough, making sure to get it close to the edges. Then, generously sprinkle the 1 cup of shredded cheese over the herb butter. Press down gently with your hands to help the cheese adhere to the butter.
Now, starting from one of the longer sides, tightly roll up the dough into a log. Try to keep the roll as even as possible to ensure consistent sizes for your rolls. Once rolled, pinch the seam closed to seal it.
Cutting and Second Rise
Phase 5: The Final Touches Before Baking
Using a sharp knife or a bench scraper, cut the log into 12 equal-sized rolls. You can estimate about 1 inch per roll. If you have a long piece of unflavored dental floss, you can use it to cut the rolls cleanly without squishing them – just slide the floss under the log, cross the ends over the top, and pull gently.
Arrange the cut rolls cut-side up in a greased 9×13 inch baking pan. Try to place them fairly close together but with a little space for them to expand. Cover the pan loosely with plastic wrap or a clean kitchen towel. Let the rolls rise for another 45-60 minutes, or until they are visibly puffy and have nearly doubled again. They should be touching each other by the end of this rise.
Preheat your oven to 375°F (190°C) during the last 15 minutes of this second rise.
Baking and Glistening Finish
Phase 6: Golden Perfection
Gently brush the tops of the risen rolls with the egg wash mixture. This will give them a beautiful golden-brown sheen and a slightly crispier crust. After applying the egg wash, sprinkle a little extra shredded cheese over each roll, and then add a pinch of additional dried herbs for that extra touch of visual appeal and aroma.
Bake for 20-25 minutes, or until the rolls are golden brown and cooked through. You’ll notice the cheese will be beautifully melted and perhaps a little bubbly. The aroma filling your kitchen will be absolutely incredible.
Once baked, remove the pan from the oven. You can let them cool in the pan for a few minutes before transferring them to a wire rack to cool slightly. These Sourdough Herb and Cheese Rolls are best enjoyed warm, perhaps with a touch of extra butter. They make a fantastic side dish or a delicious snack on their own.

Conclusion:
And there you have it – your guide to creating delicious Sourdough Herb and Cheese Rolls! We’ve walked through the rewarding process of transforming simple ingredients into these delightfully tangy, herb-infused, and cheesy delights. The journey of sourdough is always a rewarding one, and these rolls are a perfect testament to that. Don’t be intimidated; the steps are manageable, and the result is absolutely worth it. Experiment with different herbs and cheeses to make them uniquely yours!
These Sourdough Herb and Cheese Rolls are incredibly versatile. Serve them warm alongside a hearty soup or stew, as a delightful accompaniment to a salad, or simply enjoy them on their own as a satisfying snack. They also make a fantastic base for mini sandwiches!
Don’t hesitate to get creative with your flavor combinations. Consider adding a pinch of garlic powder, a sprinkle of red pepper flakes for a touch of heat, or even some finely chopped sun-dried tomatoes for an extra burst of flavor. The beauty of baking is the endless potential for customization.
So go forth and bake with confidence! Embrace the sourdough starter, enjoy the process, and savor every bite of your homemade Sourdough Herb and Cheese Rolls. I encourage you to share your creations with friends and family – they’ll be absolutely impressed!
Frequently Asked Questions:
Q: My sourdough starter isn’t very active. Can I still make these rolls?
While an active and bubbly sourdough starter is ideal for the best rise and flavor, you can still proceed with a less vigorous starter. Your rolls might be a bit denser, but the flavor will still be present. Ensure your starter has been fed consistently for at least a week prior to baking, and try to use it at its peak activity, typically 4-12 hours after feeding.
Q: Can I freeze these Sourdough Herb and Cheese Rolls?
Absolutely! Once completely cooled, you can freeze the Sourdough Herb and Cheese Rolls for up to 3 months. Wrap them tightly in plastic wrap, then place them in a freezer-safe bag or container. To reheat, you can thaw them at room temperature and then warm them gently in an oven or toaster oven for a fresh-baked taste.
Sourdough Herb Cheese Rolls
Flavorful and easy sourdough rolls bursting with herbs and cheese. Perfect as a side dish or a delicious snack.
Ingredients
-
½ cup (120g) sourdough starter (discard or active)
-
¾ cup (180ml) warm milk
-
2½ cups (315g) all-purpose flour
-
2 tablespoons unsalted butter, melted
-
1 tablespoon sugar
-
1 teaspoon salt
-
½ teaspoon garlic powder (optional)
-
1 cup shredded cheese (cheddar, mozzarella, or parmesan)
-
2 tablespoons unsalted butter, softened
-
1 teaspoon dried oregano
-
1 teaspoon dried basil
-
½ teaspoon black pepper
-
1 egg yolk mixed with 1 tablespoon water (for egg wash)
-
Extra shredded cheese for sprinkling
-
Additional dried herbs for garnish
Instructions
-
Step 1
In a large bowl, combine warm milk and sourdough starter. Whisk in melted butter, sugar, salt, and optional garlic powder. Gradually add flour, stirring until a shaggy dough forms. -
Step 2
Turn dough onto a floured surface and knead for 8-10 minutes until smooth and elastic. Shape into a ball, place in a greased bowl, cover, and let rise in a warm place for 2-4 hours until doubled. -
Step 3
While dough rises, mix softened butter, oregano, basil, and black pepper to create a herb butter paste. Preheat oven to 375°F (190°C) during the last 15 minutes of the second rise. -
Step 4
Punch down the risen dough and roll into a 10×12 inch rectangle. Spread the herb butter paste evenly over the dough and sprinkle generously with shredded cheese. Press gently to adhere. -
Step 5
Tightly roll the dough into a log from a long side, pinch the seam closed. Cut the log into 12 equal rolls. Arrange rolls cut-side up in a greased 9×13 inch baking pan, cover, and let rise for 45-60 minutes until puffy and nearly doubled. -
Step 6
Brush rolls with egg wash, sprinkle with extra cheese and dried herbs. Bake for 20-25 minutes until golden brown and cooked through. Cool slightly before serving.
Important Information
Nutrition Facts (Per Serving)
It is important to consider this information as approximate and not to use it as definitive health advice.
Allergy Information
Please check ingredients for potential allergens and consult a health professional if in doubt.