Crispy Chicken Caesar Sandwich – Best Quick Lunch
Crispy Chicken Caesar Sandwich. Ah, the humble sandwich, a culinary canvas for endless delicious possibilities. But when you’re craving something truly satisfying, something that hits all the right notes of texture and flavor, the Crispy Chicken Caesar Sandwich is an undisputed cbeef hampion. We all know and love the classic Caesar salad – its creamy, tangy dressing, the sharp bite of Parmesan, the satisfying crunch of croutons. Now, imagin extracte all that goodness piled high on perfectly fried, golden-brown chicken, nestled between soft, toasted buns. It’s a symphony of textures and tastes that makes this sandwich an absolute crowd-pleaser. What makes the Crispy Chicken Caesar Sandwich so special is its brilliant fusion of familiar comfort food with the sophisticated elegance of a beloved salad. It’s the perfect balance of indulgence and freshness, making every single bite an experience to remember. Get ready to elevate your lunch game!
Ingredients:
- ½ cup full-fat mayonnaise
- 3 tbsp Greek yogurt
- 1 tsp Dijon mustard
- 1 tsp Worcestershire sauce
- 2 tbsp fresh lemon juice
- ¼ cup freshly grated Parmesan cheese
- 1-2 garlic cloves, minced
- ¼ tsp black pepper
- Pinch of sea salt
- 5 chicken cutlets (see note 1 for preparation)
- Sea salt, to taste
- Ground black pepper, to taste
- Oil, for frying (vegetable, canola, or peanut oil work well)
- ⅓ cup all-purpose flour
- ½ tsp salt (for the flour mixture)
For the Crispy Chicken Caesar Sandwich
Preparing the Chicken
First, let’s get our chicken cutlets ready for that incredible crispy coating. If your chicken cutlets are on the thicker side, I recommend gently pounding them to an even thickness, about ½ inch. This ensures they cook through evenly and become wonderfully crisp all over. You can do this by placing the cutlets between two sheets of plastic wrap or parchment paper and using a meat mallet, rolling pin, or even the bottom of a heavy pan. Once they’re pounded to your desired thickness, season both sides generously with sea salt and ground black pepper. Don’t be shy with the seasoning; it’s the first layer of flavor for our delicious sandwich.
Creating the Dredgin extractg Station
Now, let’s set up gin extract dredging station. This is where the magic happens for achieving that perfectly crispy exterior. In a shallow dish, combine the ⅓ cup of all-purpose flour with the ½ teaspoon of salt. Whisk this together thoroughly. This seasoned flour is crucial for creating a light, crispy coating that adheres beautifully to the chicken. You’ll want to have this ready before you start frying. The key to a really good crisp is to ensure each piece of chicken is well-coated.
Making the Caesar Dressing
While the chicken rests, we’ll whip up a quick and flavorful Caesar dressing. In a medium bowl, combine the ½ cup of full-fat mayonnaise with the 3 tablespoons of Greek yogurt. The Greek yogurt adds a delightful tang and creaminess without making the dressing too heavy. Next, stir in the 1 teaspoon of Dijon mustard, which provides a little zest and depth. Add the 1 teaspoon of Worcestershire sauce for that characteristic umami flavor. Squeeze in the 2 tablespoons of fresh lemon juice – this is vital for brightness and cutting through the richness. Now, fold in the ¼ cup of freshly grated Parmesan cheese. The fresh Parmesan melts beautifully into the dressing, adding a salty, nutty complexity. Finally, add the 1-2 minced garlic cloves. The amount of garlic can be adjusted to your preference, but I find one good-sized clove or two smaller ones to be perfect. Season the dressing with a ¼ teaspoon of black pepper and a pinch of sea salt. Taste and adjust the seasonings as needed. You want a dressing that is balanced, creamy, and packed with flavor.
Frying the Chicken
Heat about 1-2 inches of oil in a large, heavy-bottomed skillet or Dutch oven over medium-high heat until it reaches about 350°F (175°C). You can test if the oil is hot enough by dropping a tiny pinch of flour into it; if it sizzles immediately and floats, the oil is ready. Carefully place the seasoned chicken cutlets into the hot oil, making sure not to overcrowd the pan. Overcrowding will lower the oil temperature and result in soggy chicken. Fry the chicken for about 3-4 minutes per side, or until it’s golden brown and cooked through. The internal temperature should reach 165°F (74°C). Once cooked, carefully remove the chicken from the oil using tongs and place it on a wire rack set over a baking sheet. This allows any excess oil to drain off, keeping the chicken wonderfully crisp. Repeat with the remaining chicken cutlets, ensuring the oil returns to temperature between batches.
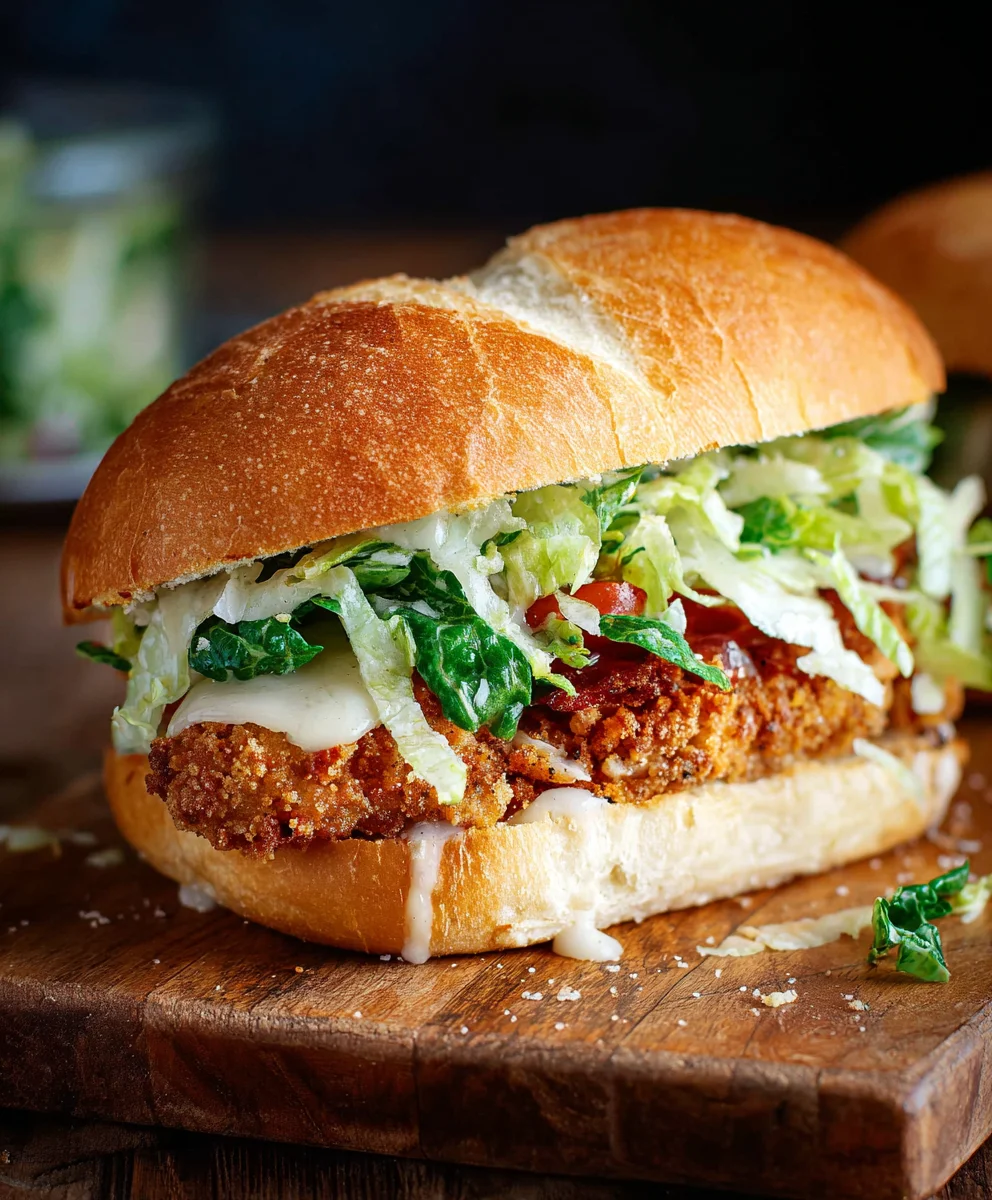
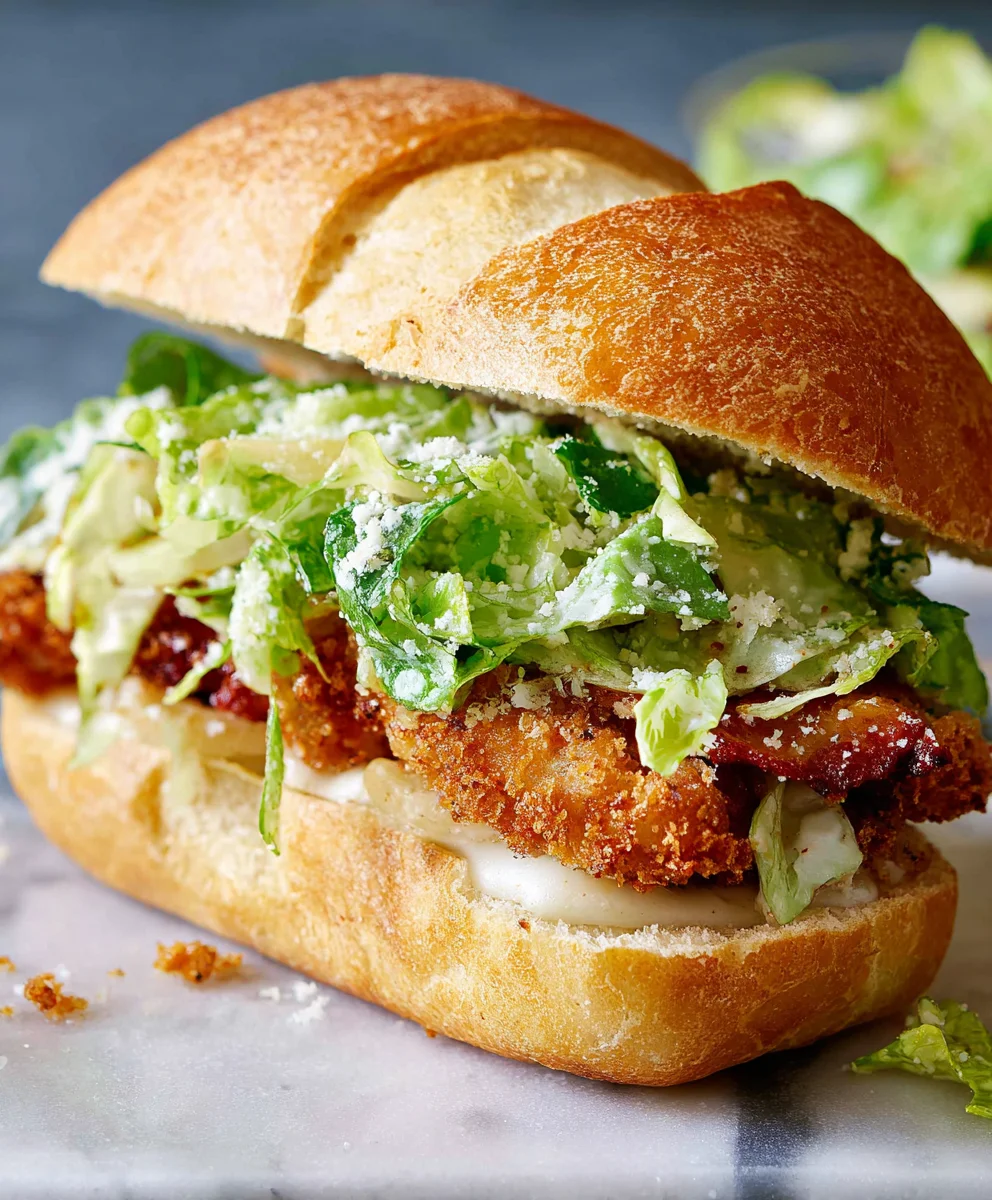
Assembling the Crispy Chicken Caesar Sandwich
Once your chicken is fried to golden perfection and has drained, it’s time for assembly! Lightly toast your favorite sandwich rolls or buns until they’re slightly golden and firm. Spread a generous layer of your homemade Caesar dressing on the bottom half of each bun. Place a crispy chicken cutlet on top of the dressing. Add extra Caesar dressing to the top bun, if desired, or pile on some crisp romaine lettuce for a classic Caesar salad topping. You can also add a few extra shavings of Parmesan cheese over the chicken for an extra burst of flavor. Close the sandwich, and there you have it – a sensational Crispy Chicken Caesar Sandwich! The combination of the crunchy chicken, creamy dressing, and soft bun is simply divine. This recipe is perfect for a satisfying lunch or a casual dinner.
Conclusion:
There you have it – the ultimate guide to crafting the perfect Crispy Chicken Caesar Sandwich! We’ve walked through each step, from preparing that wonderfully crunchy chicken to assembling the layers of creamy dressing, sharp Parmesan, and fresh romaine. This sandwich is more than just a meal; it’s a flavor explosion that’s incredibly satisfying. I truly encourage you to give this recipe a try. It’s a fantastic option for a quick and delicious lunch, a casual dinner, or even a crowd-pleasing appetizer if you cut them into smaller portions.
For serving, consider pairing your Crispy Chicken Caesar Sandwich with a side of seasoned sweet potato fries or a light, zesty coleslaw. They complement the richness of the sandwich beautifully. Don’t be afraid to get creative with variations! You can easily swap out the romaine for spinach or arugula, add some sun-dried tomatoes for a tangy kick, or even use a different type of cheese like provolone. The possibilities are endless, and the result will always be a winner.
Frequently Asked Questions:
How can I make the chicken extra crispy?
For maximum crispiness, ensure your breading mixture is thick and evenly coats the chicken. Frying at the correct oil temperature (around 350°F or 175°C) is also crucial. Don’t overcrowd the pan, as this will lower the oil temperature and result in soggy chicken.
Can I prepare parts of the Crispy Chicken Caesar Sandwich ahead of time?
Yes! You can bread and fry the chicken earlier in the day and reheat it in a hot oven for a few minutes to regain its crispiness. The dressing can also be made a day in advance. However, it’s best to assemble the sandwich just before serving to prevent the bread from becoming soggy.
Crispy Chicken Caesar Sandwich – Best Quick Lunch
A quick and delicious recipe for a crispy chicken Caesar sandwich, perfect for a satisfying lunch or a casual dinner.
Ingredients
-
½ cup full-fat mayonnaise
-
3 tbsp Greek yogurt
-
1 tsp Dijon mustard
-
1 tsp Worcestershire sauce
-
2 tbsp fresh lemon juice
-
¼ cup freshly grated Parmesan cheese
-
1-2 garlic cloves, minced
-
¼ tsp black pepper
-
Pinch of sea salt
-
5 chicken cutlets
-
Sea salt, to taste
-
Ground black pepper, to taste
-
Oil, for frying
-
⅓ cup all-purpose flour
-
½ tsp salt (for the flour mixture)
Instructions
-
Step 1
Prepare the chicken cutlets by pounding them to an even thickness of about ½ inch. Season both sides generously with sea salt and ground black pepper. -
Step 2
Set up a dredging station: in a shallow dish, whisk together ⅓ cup all-purpose flour and ½ teaspoon of salt. -
Step 3
Make the Caesar dressing: in a medium bowl, combine ½ cup full-fat mayonnaise, 3 tablespoons Greek yogurt, 1 teaspoon Dijon mustard, 1 teaspoon Worcestershire sauce, 2 tablespoons fresh lemon juice, ¼ cup freshly grated Parmesan cheese, 1-2 minced garlic cloves, ¼ teaspoon black pepper, and a pinch of sea salt. Stir until well combined and taste to adjust seasonings. -
Step 4
Heat about 1-2 inches of oil in a large skillet over medium-high heat until it reaches about 350°F (175°C). Carefully place the seasoned chicken cutlets into the hot oil, ensuring not to overcrowd the pan. Fry for 3-4 minutes per side, or until golden brown and cooked through (internal temperature of 165°F/74°C). Remove chicken and drain on a wire rack. -
Step 5
Assemble the sandwiches: lightly toast your favorite sandwich rolls or buns. Spread a generous layer of Caesar dressing on the bottom half of each bun. Place a crispy chicken cutlet on top. Add extra dressing to the top bun, or top with romaine lettuce and extra Parmesan shavings if desired. Close the sandwich.
Important Information
Nutrition Facts (Per Serving)
It is important to consider this information as approximate and not to use it as definitive health advice.
Allergy Information
Please check ingredients for potential allergens and consult a health professional if in doubt.