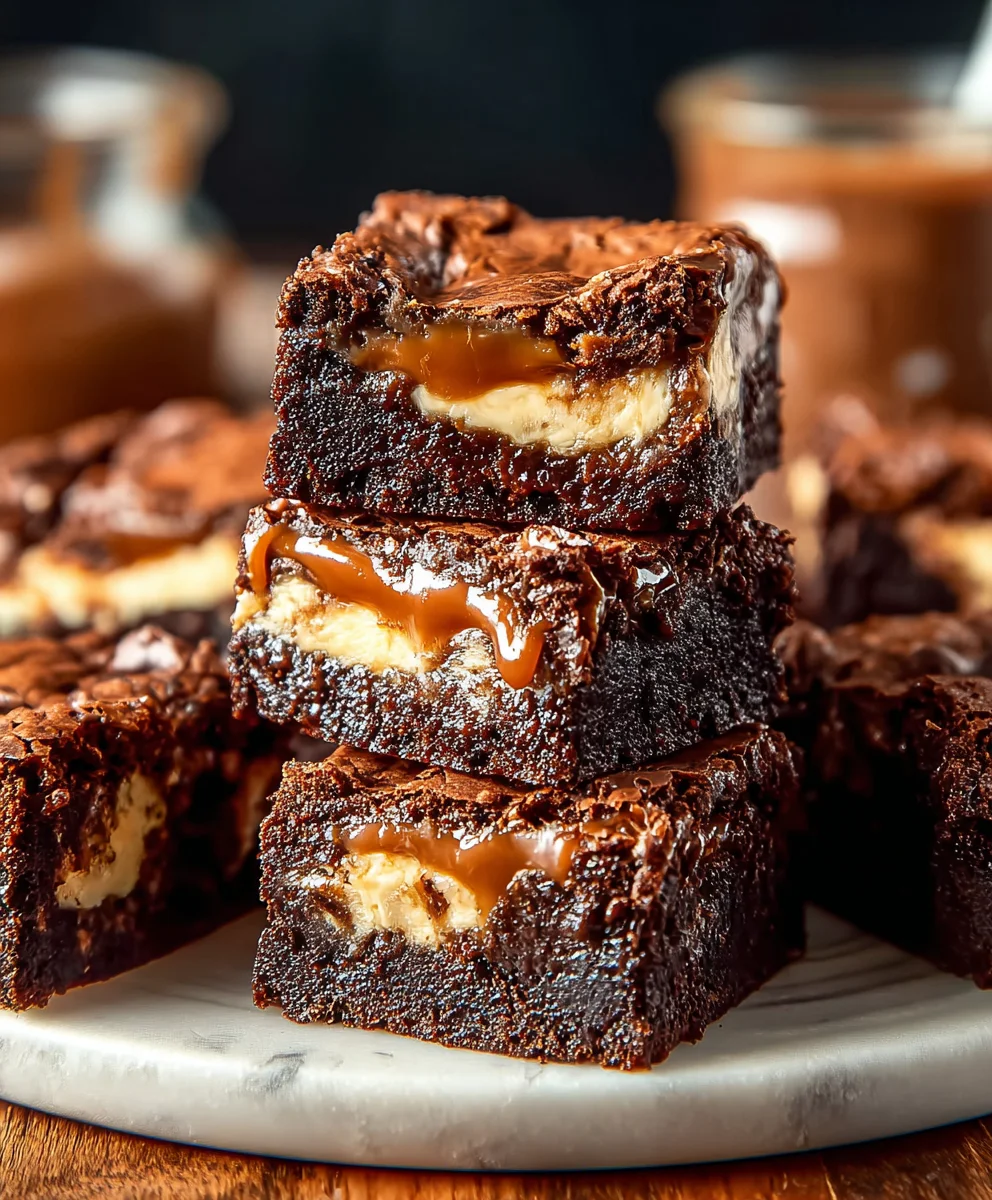
Caramel Nutella Cheesecake Brownies-Decadent Dessert
Caramel Cheesecake Nutella Brownies are the ultimate indulgence, a dessert lover’s dream come true that expertly marries three beloved treats into one magnificent creation. If you’ve ever found yourself torn between a rich, fudgy brownie, a creamy, decadent cheesecake, and the irresistible allure of Nutella, your internal debate is officially over. This recipe is for you! The magic lies in its layered complexity; a thick, chewy brownie base, swirled with a luscious cheesecake batter infused with hazelnut cocoa spread, and finished with a shimmering ribbon of homemade caramel. It’s the perfect balance of textures and flavors – the intense chocolate goodness of the brownie, the subtle tang and creaminess of the cheesecake, and the sweet, buttery richness of the caramel. Get ready to impress yourself and everyone lucky enough to share these extraordinary Caramel Cheesecake Nutella Brownies. This isn’t just dessert; it’s an experience you won’t soon forget, a true testament to what happens when extraordinary ingredients are brought together with a little bit of love and a whole lot of culinary flair.
Ingredients:
- 3/4 cup unsalted butter, melted
- 6 ounces dark chocolate (50-60% cocoa), finely chopped
- 1 1/4 cups all-purpose flour
- 1/2 cup unsweetened cocoa powder
- 3 medium eggs, at room temperature
- 1 cup granulated sugar (for the brownie batter)
- 1/3 cup light brown sugar, packed
- 1 tablespoon vanilla extract (divided)
- 1/4 teaspoon salt
- 1/3 cup dark chocolate chunks
- 1/2 cup milk chocolate chunks
- 8 ounces full-fat cream cheese, softened
- 1/3 cup granulated sugar (for the cheesecake layer)
- 1 medium egg yolk
Caramel Cheesecake Nutella Brownies: Crafting Decadent Layers
This recipe brings together the intense richness of chocolate brownies, the creamy tang of cheesecake, and the irresistible sweetness of Nutella (implied by the caramel and chocolate chunks that mimic its flavor profile). Get ready to create a dessert that is truly unforgettable.
Brownie Base Preparation
Begin extract by preheating your oven to 350°F (175°C). Line a 9-inch square baking pan with parchment paper, leaving an overhang on all sides. This will make it much easier to lift the brownies out of the pan once they’re cooled and set. In a heatproof bowl set over a saucepan of simmering water (a double boiler), combine the melted unsalted butter and the finely chopped dark chocolate. Stir gently until the chocolate is completely melted and smooth. Be patient and avoid direct heat, which can scorch the chocolate. Once melted, remove the bowl from the heat and let it cool slightly for about 5 minutes.
In a separate large bowl, whisk together the all-purpose flour, unsweetened cocoa powder, and salt. Make sure there are no lumps in the cocoa powder. In another medium bowl, whisk together the 3 medium eggs, the 1 cup of granulated sugar, the packed light brown sugar, and 2 teaspoons of the vanilla extract. Whisk until the mixture is well combined and slightly lighter in color.
Now, gradually pour the slightly cooled chocolate-butter mixture into the egg mixture, whisking constantly until everything is fully incorporated and you have a glossy, uniform batter. Be sure to scrape down the sides of the bowl to ensure all ingredients are incorporated. Fold in the dark chocolate chunks and milk chocolate chunks until they are evenly distributed throughout the batter. Don’t overmix at this stage; we want those pockets of melty chocolate. Pour about two-thirds of this brownie batter into the prepared baking pan and spread it evenly.
Cheesecake Layer Creation
While the brownie base is chilling slightly, let’s prepare the luscious cheesecake layer. In a medium bowl, beat the softened full-fat cream cheese with an electric mixer until it’s completely smooth and creamy, with no lumps. This is crucial for a smooth cheesecake texture. Add the 1/3 cup of granulated sugar and the remaining 1 teaspoon of vanilla extract to the cream cheese. Beat again until well combined. Add the single medium egg yolk and beat on low speed until just incorporated. Be careful not to overbeat the cheesecake mixture once the egg yolk is added, as this can lead to cracking.
Gently dollop spoonfuls of the cheesecake mixture over the brownie batter in the baking pan. Once all the cheesecake mixture is dolloped, carefully use a knife or a toothpick to swirl the cheesecake into the brownie batter. You can create random patterns or intricate designs, but don’t over-swirl, as you want distinct layers. After swirling, take the remaining one-third of the brownie batter and carefully spoon it over the cheesecake layer. Use an offset spatula or the back of a spoon to spread it as evenly as possible, covering the cheesecake layer. This might feel a little messy, but that’s part of the charm of these brownies.
Baking and Cooling for Perfection
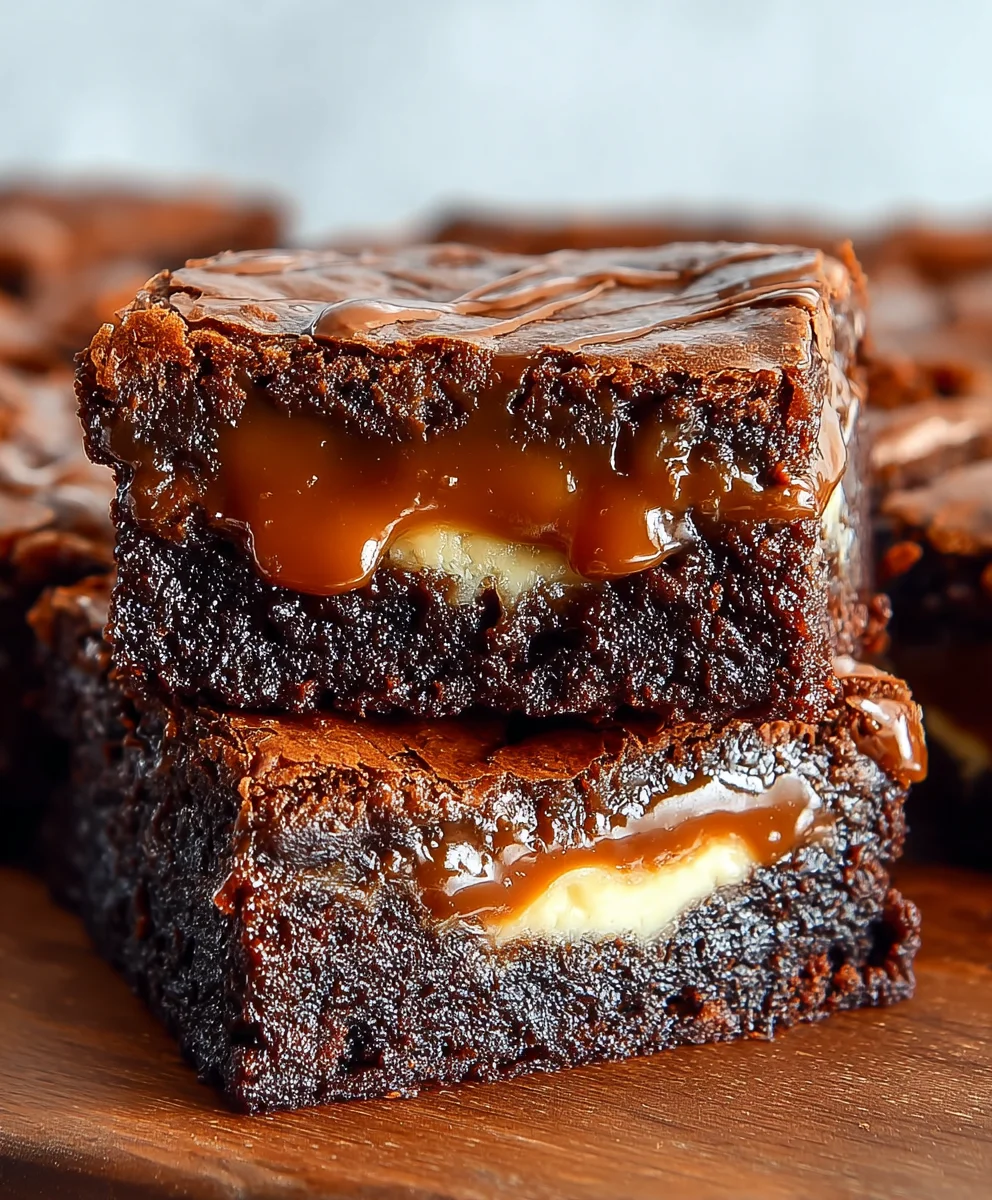
Place the pan in the preheated oven. Bake for 30 to 35 minutes, or until the edges of the brownies are set and a toothpick inserted into the center comes out with moist crum extractbs attached, not wet batter. The cheesecake layer should also be mostly set, with perhaps a slight jiggle in the very center. It’s important not to overbake, as this will result in dry brownies. Once baked, remove the pan from the oven and let the Caramel Cheesecake Nutella Brownies cool completely on a wire rack. This cooling process is absolutely essential for the layers to set properly and for the flavors to meld. Rushing this step will lead to a gooey mess.
For the cleanest cuts, it’s best to chill the brownies in the refrigerator for at least 2-3 hours, or even overnight, before slicing. Once thoroughly chilled, use the parchment paper overhang to lift the entire block of brownies out of the pan. Place it on a cutting board and use a sharp knife to cut them into your desired squares. For super clean cuts, you can wipe your knife with a damp cloth between each cut. Enjoy these rich, decadent, and beautifully layered treats!
Conclusion:
And there you have it – the ultimate guide to creating absolutely divine Caramel Cheesecake Nutella Brownies! We’ve walked through each step, from crafting that rich, fudgy brownie base to swirling in the creamy cheesecake and decadent Nutella, culminating in a glorious caramel drizzle. These brownies are a true showstopper, perfect for birthdays, potlucks, or simply when a serious craving strikes. I encourage you to give this recipe a try; the reward of those intense chocolatey, caramel, and nutty flavors is truly worth it!
For serving, I love these Caramel Cheesecake Nutella Brownies slightly warmed with a scoop of vanilla bean ice cream or a dollop of freshly whipped cream. They also stand magnificently on their own with a strong cup of coffee or a glass of milk.
Feel free to experiment with variations! You could add a sprinkle of sea salt on top of the caramel for a salted caramel twist, or fold in some chopped toasted hazelnuts for extra crunch. Different types of chocolate chips can also be incorporated into the brownie batter for a subtle change in flavor.
Frequently Asked Questions:
How do I ensure the cheesecake swirl is well-distributed?
For the best cheesecake swirl, ensure your cream cheese is at room temperature. Gently dollop the cheesecake mixture over the Nutella layer and use a toothpick or skewer to create swirls. Don’t over-mix, as you want distinct ribbons of cheesecake throughout the brownie.
Can I make these Caramel Cheesecake Nutella Brownies ahead of time?
Absolutely! These brownies are even better the next day as the flavors meld together. Store them in an airtight container at room temperature for up to 3 days, or in the refrigerator for a slightly firmer texture.
Caramel Nutella Cheesecake Brownies-Decadent Dessert
A decadent dessert recipe that combines rich chocolate brownies with a creamy cheesecake layer and Nutella-inspired chocolate swirls.
Ingredients
-
3/4 cup unsalted butter, melted
-
6 ounces dark chocolate (50-60% cocoa), finely chopped
-
1 1/4 cups all-purpose flour
-
1/2 cup unsweetened cocoa powder
-
3 medium eggs, at room temperature
-
1 cup granulated sugar (for the brownie batter)
-
1/3 cup light brown sugar, packed
-
1 tablespoon vanilla extract (divided)
-
1/4 teaspoon salt
-
1/3 cup dark chocolate chunks
-
1/2 cup milk chocolate chunks
-
8 ounces full-fat cream cheese, softened
-
1/3 cup granulated sugar (for the cheesecake layer)
-
1 medium egg yolk
-
1 teaspoon vanilla extract
Instructions
-
Step 1
Preheat oven to 350°F (175°C). Line a 9-inch square baking pan with parchment paper. Melt butter and dark chocolate in a double boiler, cool slightly. -
Step 2
In a large bowl, whisk flour, cocoa powder, and salt. In another bowl, whisk eggs, 1 cup granulated sugar, brown sugar, and 2 tsp vanilla extract. Gradually add chocolate mixture to egg mixture, whisking until smooth. Fold in chocolate chunks. -
Step 3
Pour two-thirds of the brownie batter into the prepared pan. In a medium bowl, beat cream cheese until smooth. Beat in 1/3 cup granulated sugar and 1 tsp vanilla extract. Add egg yolk and beat until just incorporated. -
Step 4
Dollop cheesecake mixture over brownie batter. Swirl cheesecake into brownie batter with a knife or toothpick. Spoon remaining brownie batter over cheesecake layer and spread evenly. -
Step 5
Bake for 30-35 minutes until edges are set and a toothpick comes out with moist crumbs. Cool completely on a wire rack, then chill in the refrigerator for at least 2-3 hours or overnight for clean slicing.
Important Information
Nutrition Facts (Per Serving)
It is important to consider this information as approximate and not to use it as definitive health advice.
Allergy Information
Please check ingredients for potential allergens and consult a health professional if in doubt.